12 Best Upper Body Exercises to Build Strength and Muscle Fast

12 Best Upper Body Exercises to Build Strength and Muscle Fast


12 Best Upper Body Exercises to Build Strength and Muscle Fast

Upper-body workouts are essential for building strength, improving posture, and creating a balanced physique. From classic bench presses to powerful barbell rows, the right exercises can help you gain muscle, boost endurance, and enhance overall performance in and out of the gym.


Whether you’re a beginner starting your fitness journey or an experienced lifter looking to upgrade your routine, choosing the best upper body exercises can make a huge difference in your results. That’s why we’ve put together this expert-backed list of the 12 best upper body exercises to help you build strength, increase muscle definition, and create effective grab-and-go workout routines for your next training session.


What You Need for the Upper Body Workout

Some of these exercises are moves you can perform at home with little to no equipment. However, your upper body consists of many different muscles, and you can’t hit them all with pull-ups and push-ups.

If you want to use the exercises in this list, you’ll probably need access to a commercial gym (or a very well-furnished home gym). The main pieces of equipment you should have are:

  • Barbell
  • Weight Plates
  • Dumbbells
  • Adjustable Weight Bench
  • Adjustable Cable Station
  • Squat or Power Rack
  •  

1. Overhead Press 


BarBend's Jake Herod performing the barbell overhead press.
Equipment NeededSquat or power rack, barbell, weight plates, wrist wraps (optional)
Muscles WorkedShoulders, triceps
Sets & Reps3-4 x 5-8

The strict press is one of the best shoulder exercises. We like it for its simplicity and functionality. If you can properly push a barbell over your head, you can do almost any other shoulder movement out there.

“Upper body strength movements, such as the bench press and overhead press, are essential for developing the pectoral, deltoid, and triceps muscles, contributing to overall upper body mass and power,” says BarBend Expert Gianna Masi.

You can use dumbbells, kettlebells, or a barbell for the strict press. Lifting a barbell does require more shoulder mobility, so if that’s something you’re lacking, start with dumbbells. 

How To Do It

  1. Set a barbell in the rack at shoulder height. With your hands shoulder-width apart, grab the bar from underneath, letting it sit in your palms, and set it at the top of your chest.
  2. Tighten your core and push your chest out to create a strong base. 
  3. Using only your upper body, move your chin out of the way and push the bar up in a straight line. 
  4. Lock your elbows out at the top of the lift and slowly lower back to the starting position.

Modifications

  • Make It Easier: Try an incline press instead.  For some people, a direct overhead press requires mobility their shoulders may not have, but you can derive most of (if not all) the same benefits from an incline press as an overhead press.
  • Make It Harder: Try a push press.  This is essentially an overhead press with a leg drive.  This allows slightly more weight while utilizing the coordination of the legs and core muscles to drive up into the bar..

Coach’s Tip: Warm up your rotator cuffs extensively before performing this lift.

2. Bench Press

BarBend's Jake Herod doing bench pressing a barbell in the Barbend gym.
Equipment NeededBench press station, barbell, weight plates, wrist wraps (optional)
Muscles WorkedChest, shoulders, triceps
Sets & Reps3-4 x 6-10

The bench press and all its variations (incline, decline, close-grip, with dumbbells, or the floor press) is a movement that targets the chest, triceps, and shoulders. It is one of the best movements to build horizontal pressing strength. 

Like most barbell exercises, it allows you to use a greater load than you could muster with kettlebells or dumbbells. Powerlifters should train the bench press routinely since it’s one of the three competition lifts alongside the squat and deadlift.

How To Do It

  1. Lie flat on your back on a bench and get your eyes directly underneath the barbell. 
  2. Grip the bar with your hands wider than shoulder-width apart. Bring your feet closer to your glutes, push your feet back, and unrack the bar so that it’s over your chest. 
  3. Lower the bar slowly to your chest as you breathe in and push your feet back. 
  4. Arch your back slightly to push the barbell up until lockout.

Modifications

  • Make It Easier: Try the floor press to limit your range of motion and add more stability.
  • Make It Harder: Pause with the bar on your chest for two seconds on every rep. 

Coach’s Tip: “Think about driving your body away from the bar and into the bench instead of reaching your arms up. This will help use the bench’s stability and keep you locked in throughout the movement,” Masi recommends.

3. Bent-Over Barbell Row

BarBend's Jake Herod performing the barbell row exercise.
Equipment NeededBarbell, weight plates, lifting straps (optional), lifting belt (optional)
Muscles WorkedLats, traps, lower back, biceps, core 
Sets & Reps3 x 6-12

The bent-over row is a popular exercise since it strengthens and increases mass in the upper back and lats. It allows you to use the most weight relative to other rowing variations. Lifting heavier weights regularly with good form equals more muscle. 

Because you’re in a hip hinge position, the bent-over row is the best lower back exercise that trains the lower back isometrically. A stronger lower back will help you brace and maintain a rigid torso when deadlifting and squatting. 

Variations To Try: Dumbbell row, seal row

How To Do It

  1. Place a loaded barbell on the floor and stand with your feet slightly more than hip-width apart. 
  2. Hinge down to the barbell and grab the barbell with a shoulder-width grip. Then, bring the barbell up to knee level with the back straight and torso bent at 45 degrees. 
  3. Pull the barbell between your navel and sternum. 
  4. Pause, then slowly lower the barbell back down and repeat.

Modifications

  • Make It Easier: Lifting straps will allow you to practice your form without worrying about the bar slipping out of your hands. 
  • Make It Harder: Try pausing with the bar in contact with your stomach at the end of each rep. 

Coach’s Tip: If you feel like you need to compromise your back position to gain momentum to start your set, you’re lifting too heavy. Lower the weight.

4. Weighted Dip

BarBend's Jake Herod performing the weighted dip exercise.
Equipment NeededParallel bars, wrist wraps (optional), dip belt (optional)
Muscles WorkedTriceps, chest, shoulders
Sets & Reps3 x 8-12

Weighted dips allow you to simultaneously work your chest and triceps depending on the positioning of your body. Compared to most triceps exercises, the range of motion you achieve doing dips is longer, so it’s generally considered one of the best triceps exercises.


Suppose you can’t do weighted dips yet — no problem. Use your body weight until you build up your strength and endurance. Once you’re ready, add weight in small increments using a dipping belt. 

How To Do It

  1. Either use a weight belt, or weighted vest, or hold a dumbbell between the legs for resistance. 
  2. Squeeze the bars with each hand and lower yourself down until your elbows break 90 degrees. 
  3. Still squeezing the bars, drive yourself upwards while maintaining a slight forward lean.
  4. When approaching lockout, flex the back of your triceps, pause for a second, and slowly lower down and repeat.

Coach’s Tip: To target your chest more specifically, lean your torso forward.

5. Chin-Up

BarBend's Jake Herod doing a chin-up using a pull up bar.
Equipment NeededPull-up bar, dip belt (optional)
Muscles WorkedLats, biceps, upper back
Sets & Reps3-4 x 10+

The chin-up requires a lot of prerequisite strength, stability, and mobility — but perhaps less so than the pull-up. In this way, the chin-up may be more accessible to beginners. If you’re still new to the movement, use resistance bands to assist you.

And if you’ve already mastered the chin-up, keeping them actively in your repertoire will help ensure continued back and biceps strength. You can even add pauses at various spots in your range of motion to increase time under tension and kickstart even more muscle growth.

Variations To Try: Single-arm, band-assisted, or kipping

How To Do It

  1. Grab hold of a pull-up bar with your palms facing you, a little closer than shoulder-width apart.
  2. Hang from the bar until you’re stable. Initiating the pull with your back, drive your elbows down toward your back packets.
  3. Pull yourself up until your chin clears the bar. Lower with control and repeat for reps.

Modifications

  • Make It Easier: Do band-assisted or machine-assisted chin-ups if you can’t string together multiple unassisted reps.
  • Make It Harder: Add weight by holding a dumbbell between your ankles or wearing a dip belt with plates attached. 

Coach’s Tip: Keep your core engaged and in a hollow hold position. This will ensure that your whole body is working and that the move is as efficient as possible.

6. Push-Up

BarBend's Jake Herod doing the standard push-up.
Equipment NeededExercise mat (optional)
Muscles WorkedChest, shoulders, triceps
Sets & Reps2-3 x 10-20

Ah, the push-up. It’s one of the best chest exercises, yet so many people struggle with push-ups or discard them altogether. But when done with good form and a full range of motion, this compound exercise activates multiple muscles in your upper body, such as your chest, shoulders, triceps, and abdominals. 

Push-ups are a quick and effective way to build strength and require nothing but your body weight. (Though, you can add a weight vest or weight plate to make the movement more challenging.)

How To Do It

  1. Start in a plank position with your hands stacked underneath your shoulders, your back flat, and your core tight. 
  2. Maintaining a straight line from your head to your heels, slowly lower your body to the floor by bending your elbows. Go as close to the ground as you can without losing tension.
  3. Press the floor away from your hands while maintaining a tight core to avoid dipping hips. Finish in the position you started in.

Modifications

  • Make It Easier: You can do push-ups on your knees or perform incline push-ups to make the movement easier.
  • Make It Harder: Try decline push-ups or bring your hands into a diamond position. 

Coach’s Tip: If your chest or stomach prevents you from reaching a full range of motion, you can place your hands on low steps, dumbbells, or push-up bars to give your body the room you need.

7. Lat Pulldown

BarBend's Jake Herod performing the lat pulldown exercise.
Equipment NeededLat pulldown station, lifting straps (optional)
Muscles WorkedLats, upper back, biceps
Sets & Reps2-3 x 10-15 

If you’re looking to target the largest muscle in your back, we suggest the lat pulldown. This exercise allows for heavier weights and more reps because your body will generally be stabilized by the machine, making it one of the best upper body pull exercises you can do.

Variations To Try: Close-grip, single-arm

How To Do It

  1. Sit straddling the bench facing the lat pulldown machine, or tuck your thighs underneath the pad if you have access to one. 
  2. Pull your shoulders away from your ears and use your back to pull the bar down to your upper chest. A slight lean back is okay if needed. 
  3. Slowly extend the arms to your starting position.

Coach’s Tip: Vary your grip using different handles or grip widths of the lat pulldown bar to alter the exercise angle.

8. Inverted Row

BarBend's Jake Herod performing an inverted row with a barbell set in a power rack.
Equipment NeededBarbell, squat rack, or stable horizontal bar 
Muscles WorkedLats, biceps, upper back, core, glutes
Sets & Reps2-3 x 10+

Secret’s out; we adore the lat pulldown. This exercise does not get as much recognition as it should — mainly because it’s seen as a “Pull-Up Lite” — but it can benefit anyone from beginners to experienced athletes if you know how to use it. 

Although underrated, there are plenty of benefits to the inverted row — it’s scalable, can be done almost anywhere, and taxes the back muscles without loading the lower back. 

How To Do It

  1. Set a barbell at waist height in a power rack
  2. Get under the bar and grip it slightly wider shoulder-width apart with your palms facing away from your head. 
  3. Extend your arms and extend your legs, so your body is in a straight line from your head to your heels. 
  4. Keeping that straight line, pull your body up to the bar until your chest reaches it, then slowly lower back to your starting position. 

Modifications

  • Make It Easier: Set the bar up a bit higher so your body is at a steeper incline.
  • Make It Harder: Balance a weight plate across your lap to add resistance. 

Coach’s Tip: Think about pulling the bar toward your body, not yanking yourself up to the bar. 

9. Overhead Triceps Extension

BarBend's Jake Herod performing the cable overhead triceps extension.
Equipment NeededAdjustable cable station, attachment of choice
Muscles WorkedTriceps
Sets & Reps2 x 12-15 

If you want bigger arms, we have a pro tip — the triceps make up roughly two-thirds of your upper arm compared to your biceps. They steal the gun show more than you think. 


“Placing the triceps overhead will put them into a fully stretched position, which will help maximize stimulating strength and hypertrophy even further then a traditional tricep extension,” Masi says. “Plus, this will be a great stretch on the shoulder joint, assisting with the overhead position.”

Variations To Try: Single-arm, underhand

How To Do It

  1. Place a dumbbell in a diamond grip (make a diamond with your hands and place the bottom of the weight plate in between) and hold it overhead with your arms fully extended. 
  2. Tighten your core, relax your shoulders, and keep your elbows tight to your head as you begin to bend your arms. Stop bending when your arms have made a 90-degree angle.
  3. Press back up to your starting position.

Modifications

  • Make It Easier: Most people tend to find a single-hand rope attachment more comfortable to use than a straight or cambered bar.
  • Make It Harder: Try pausing in the stretched position on each repetition. 

Coach’s Tip: You can perform this exercise seated or standing. Either way, keep your core steady.

10. Landmine Press

BarBend's Jake Herod performing the landmine press exercise.
Equipment NeededLandmine attachment, barbell, weight plates 
Muscles WorkedTriceps, shoulders, core
Sets & Reps2 x 12-15

The landmine press is less intense than the standard shoulder press or overhead press since it does not require as much shoulder flexion (due to the angled pressing path). 


However, that doesn’t make this exercise any easier, and it’s a great way to target your upper body without lifting too heavy.

How To Do It

  1. Set up a barbell in a landmine base or, if you don’t have one, the corner of a wall. If performing the movement with one arm, grab the barbell at the top with one hand and hold it on the side you’re pressing from. If performing the move with both hands, grip the barbell and hold it in the middle of your chest. 
  2. Press the barbell straight forward until your arm(s) are fully extended. 
  3. Slowly lower the bar back to your starting position.

Modifications

  • Make It Easier: You can do this move in a full or half-kneeling position instead of standing up. 
  • Make It Harder: Try this exercise with a narrow staggered stance to challenge your balance.

Coach’s Tip: Adjust your foot position as needed until you find the proper angle where you feel your entire shoulder girdle engaging.

11. Farmer’s Carry

BarBend's Jake Herod doing the fireman's carry with dumbbells in the gym.
Equipment NeededDumbbells, kettlebells, or trap bar frame
Muscles WorkedTraps, upper back, lower back, core 
Sets & Reps2 x 30 seconds 

Heavy carries are a great way to build a bigger and more durable upper body. Gripping a heavy object taxes the muscles in the upper back, traps, and forearms, making this upper-body exercise with dumbbells a strength-boosting move that also bolsters your endurance. 

“Make sure to actually load these!  Most people in the gym are using grocery bag type loads.  We are trying to push well past that with these,” Masi notes. “Legendary strength and conditioning coach Dan John has certain standards for these — half your body weight in each hand for 20-40 meters. If you’re really a beast he says you should be able to do that same distance with bodyweight in each hand.”

How To Do It

  1. Grab a pair of heavy dumbbells from the rack, grip them tightly, and stand tall by keeping your shoulders down and chest up. 
  2. Walk slowly and deliberately in a straight line, placing one foot in front of the other for the required distance, and then set the weight down carefully.

Coach’s Tip: Keep your shoulders back and down throughout the exercise to maintain back engagement.

12. Bicep Curls

BarBend's Jake Herod performing the dumbbell biceps curl.
Equipment NeededDumbbells or barbell
Muscles WorkedBiceps
Sets & Reps3 x 8-12

We love biceps just as much as you do — this isolation exercise is, basically, the only way to zero in on your biceps without involving other supporting muscles, making it one of the best biceps exercises. There are dozens of biceps curl variations out there, and they all accomplish mostly the same thing. If you’re new to curls, we think bicep curls are a phenomenal upper body exercise with dumbbells

Variations To Try: Cheat curl, reverse curl, incline dumbbell curl, Zottman curl

How To Do It

  1. Stand upright while holding a dumbbell in each hand.
  2. Rotate your arms so your palms are pointed forward.
  3. Without moving your upper arms, bend at the elbows and curl the weights up until your forearm is at least parallel to the floor.

Coach’s Tip: Take care to avoid swaying from side to side as you curl. If you’re using a barbell, limit any swaying or thrusting from your hips. 

5 Upper Body Workouts to Incorporate

The best upper body workouts are the ones that integrate push and pull movements to keep your body balanced in terms of both strength and muscle growth. Here are some of the upper body workouts you can incorporate into your overall program, depending on your specific fitness goals and aspects of your identity.

Upper Body Warm-Up

All good workouts start with an appropriate warm-up. Even the best upper body workout out there may not go according to plan if you don’t prepare properly. For most people, the shoulders require a bit of attention and priming before you dive into heavy lifting. Try this shoulder-focused warm-up routine:

  • Cardio: Do 5 to 10 minutes on the treadmill, elliptical, bicycle, or stair stepper to get your heart rate up.
  • Shoulder Dislocations: Grab a PVC pipe or dowel and hold it overhead with a wide grip, then slowly swing the object forward and backward in an arc around your torso.
  • Face Pulls: Grab a cable station or resistance band and perform 15-20 face pulls, driving your elbows high and behind your torso to engage your upper back.
  • Scapular Push-Ups: Assume a push-up position, but instead of bending your elbows, lift and lower your torso a few inches by pushing solely with your shoulders and allowing them to move.

Upper Body Workout for Muscle Growth

Building muscle is all about using the tools at your disposal — we mean your exercises of choice — to create as much muscle fatigue and strain as possible. To that end, we’re prioritizing exercises that have simple, stable techniques. We also want to target all major muscle groups in your upper body as efficiently as possible. 
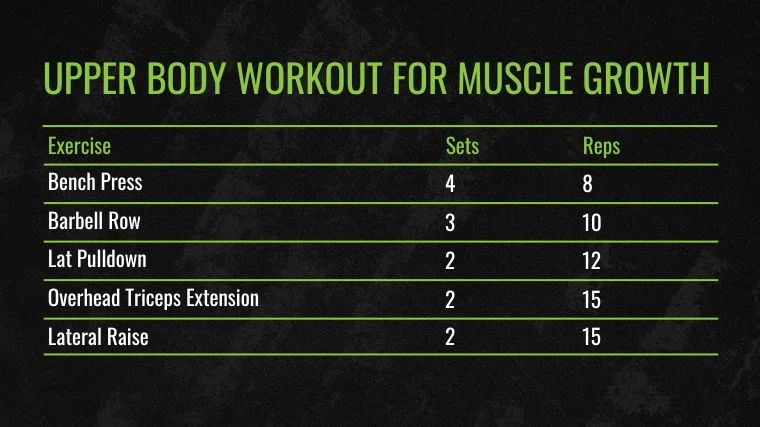
The Upper Body Workout for Muscle Growth chart.


  • Bench Press: 4 x 8
  • Barbell Row: 3 x 10 
  • Lat Pulldown: 2 x 12
  • Overhead Triceps Extension: 2 x 15
  • Lateral Raise: 2 x 15 

Upper Body Workout for Strength

To get strong, you need to focus on performing fewer reps with more weight, one exercise at a time. This low-rep, heavy-weight style of training forces muscles to exert maximal force, recruiting the more explosive type II muscle fibers needed to lift heavier weights. 

Perform this workout once per week. Be sure to get a lot of rest between sessions — this is a taxing training session. Perform all the sets for each movement before moving onto the next exercise. Also, do not cut your rest time short. Rest three to five minutes between sets for most of these.
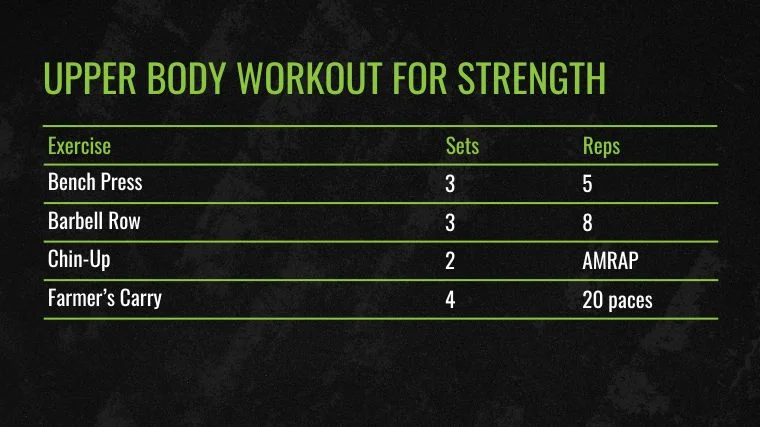
The Upper Body Workout for Strength chart.
  • Bench Press: 3 x 5 
  • Barbell Row: 3 x 8
  • Chin-Up: 2 x AMRAP 
  • Farmer’s Carry: 4 x 20 paces 

Upper Body Workout for Men 

People of all genders can follow the same workout routines. That said, cis men may have a higher ratio of Type-II, fast-twitch muscle fibers. (1) To play to your strengths and beef up your pecs, shoulders, and arms in the process, give this one a go: 
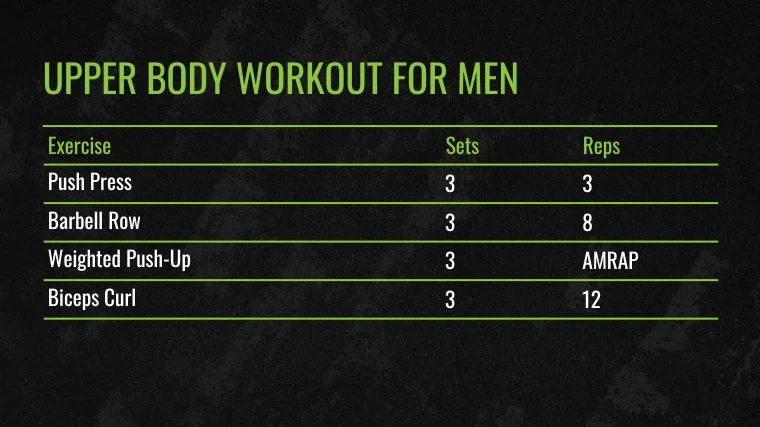
The Upper Body Workout for Men chart.

[Read More: Get Freakishly Strong With the 5×5 Workout Program]

  • Push Press: 3 x 3 
  • Barbell Row: 3 x 8
  • Weighted Push-Up: 3 x AMRAP 
  • Biceps Curl: 3 x 12 

Upper Body Workout for Women

Women can perform the same strength training workouts as anyone else. That said, some studies have shown that female athletes respond slightly better to higher-repetition training. (2) We can modify a standard upper body workout to emphasize those advantages. Here’s an example: 
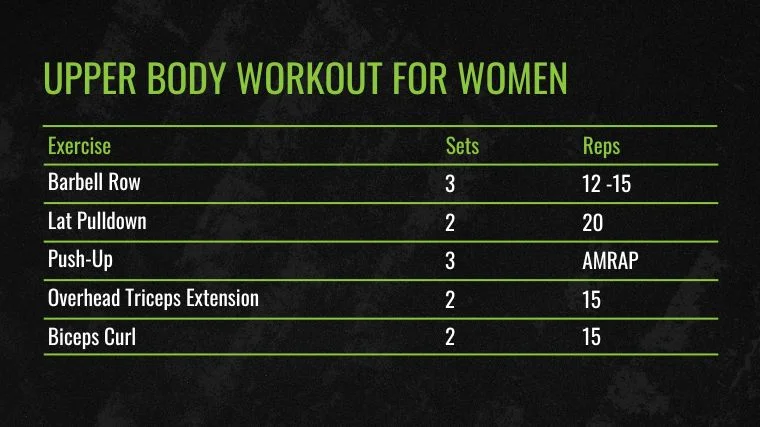
The Upper Body Workout for Women chart.
  • Barbell Row: 3 x 12-15
  • Lat Pulldown: 2 x 20 
  • Push-Up: 3 x AMRAP
  • Overhead Triceps Extension: 2 x 15
  • Biceps Curl: 2 x 15 

Bodyweight Upper Body Workout

You don’t need weights to see results (though owning dumbbells, kettlebells, weight plates, a weight bench, and a barbell doesn’t hurt). Your body weight is a useful tool for combating gravity to produce muscle- and strength-building tension. Workouts without weights are also inherently more joint-friendly since there’s no external load pressing down on your spine, knees, and/or elbows. 
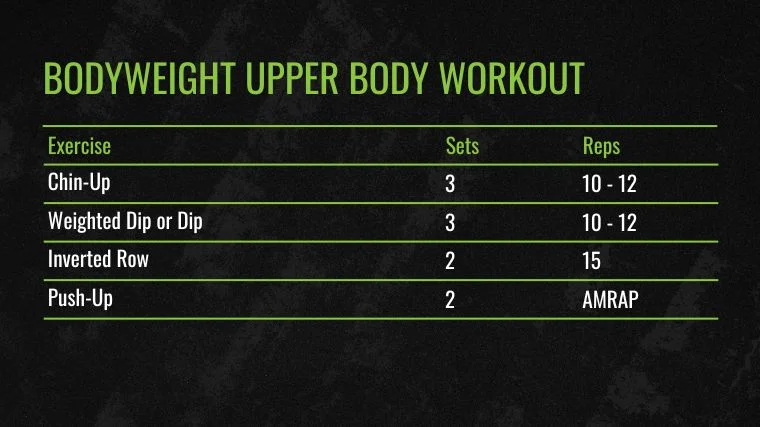
The Bodyweight Upper Body Workout chart for the best upper-body exercises.
  • Chin-Up: 3 x 10-12 
  • Weighted Dip or Dip: 3 x 10-12
  • Inverted Row: 2 x 15
  • Push-Up: 2 x AMRAP 

Benefits of Training Your Upper Body

Aside from getting the V-taper, there are plenty of benefits to training your upper body. When you are pushing, pulling, or hinging with weights or just your body weight, exercises help you perform tasks in your daily life. They improve mobility and flexibility, which can help to reduce your risk of injury. 

Reduced Risk of Injury 

With a stronger upper body comes more stability. Every day you are most likely pushing and pulling moderate to heavy objects, whether opening a door or moving furniture. Maintaining muscle mass is especially important as you age because you lose muscle as you get older. 

Research suggests that muscle mass decreases about three to eight percent per decade after you pass 30 years old, so it’s important to continue to load your muscles. (3)

Improve Other Areas of Training 

A strong upper body is not only important for better shoulder presses but is also beneficial in other areas such as squats or deadlifts. Pulling a heavy barbell when deadlifting activates your biceps and back muscles. 

The stronger these muscles, the more weight you can lift. When squatting, the core muscles are engaged, and the stronger these are, the more you can lift properly, and manage the risk of injury

Build a Strong Upper Body

It’s not just about developing other areas of your training life. By developing a strong, powerful upper body, you’ll be able to become more competitive at any strength sport. Whether you’re trying to develop an X-frame for your next bodybuilding show or boost your Total in weightlifting, you’ll need to train your upper body extensively to make it happen.

Muscles of the Upper Body

Below are some of the larger muscle groups of the upper body targeted and trained by these upper body mass-building exercises. 
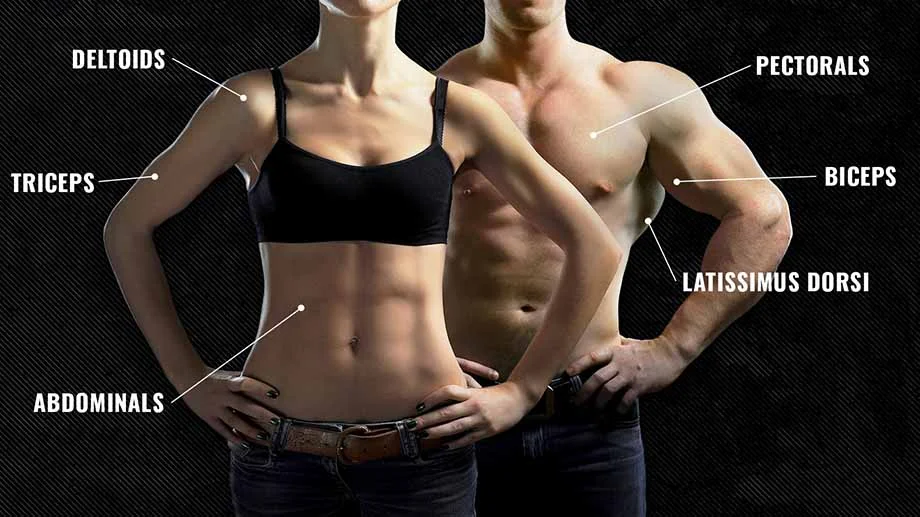
A photo of the anatomy of the upper body, labeled with the muscles worked during upper-body exercises.
Credit: Valeriy Lebedev / Shutterstock

Latissimus Dorsi (Back)

The latissimus dorsi, also known as the lats, is a large muscle group that runs across the entire posterior of the torso. The back is the key to lifting heavier, gaining size, and improving performance.


Along with the chest muscles, these muscles help posture and spine stability.

Pectorals (Chest)

The pectoral muscles (pectoralis major and minor) are developed by most horizontal pressing movements like the bench press (and the wide array of variations), push-ups, and dips. It’s important to keep these muscles strong because it helps with overall upper body strength and, along with the back muscles, helps prevent bad posture. 

Deltoids (Shoulders)

The shoulder area comprises the deltoids and posterior shoulder complex/stabilizers (trapezius, scapular shoulder blades, and rhomboids). Vertical pressing movements like push presses and shoulder press variations are great movements for shoulder hypertrophy. 

Triceps

The triceps are a smaller muscle group than the back and chest and serve an important role in aiding in pressing movements. They are also more responsible for arm mass.

Biceps

The biceps run along the anterior part of the arm and are responsible for elbow flexion and aiding in pulling movements like rows, pull-ups, carries, and deadlifts.

More Upper Body Training Tips

Now that you have a handle on the best upper body exercises to strengthen your chest, triceps, shoulders, back, and biceps, you can also check out these other helpful training articles for strength, power, and fitness athletes.

Frequently Asked Questions

How often should I train the upper body?

Your upper body is a collection of many different muscles that work together. As such, you’re likely to experience a lot of fatigue if you try to train your upper body too often. Aim for two upper body workouts per week.

What is the best upper body workout routine?

A well-designed upper body workout will contain both “push” and “pull” exercises, and also incorporate a variety of different equipment to challenge your body in unique ways. 

References

  1. Oranchuk DJ, Storey AG, Nelson AR, Cronin JB. Isometric training and long-term adaptations: Effects of muscle length, intensity, and intent: A systematic review. Scand J Med Sci Sports. 2019 Apr;29(4):484-503.
  2. Nuckols, G. (2023a, July 31). Sex differences in training and metabolism. Stronger by Science. 
  3. Fujita, Satoshi, Nazemi, Reza, & Volpi, Elena. Muscle Tissue Changes with Aging (2004). PubMed. 7(4)


What to Eat as a Female Bodybuilder for Maximum Results

What to Eat as a Female Bodybuilder for Maximum Results


What to Eat as a Female Bodybuilder for Maximum Results

What Should Female Bodybuilders Eat?

When women get into bodybuilding, nutrition becomes just as important as training. Female bodies function differently from male bodies, which means muscle growth, endurance, and recovery all require a more tailored dietary approach.


If your goal is to build muscle effectively while maintaining overall health, understanding what to eat is essential. Below is a closer look at the key nutrients and foods every female bodybuilder should focus on.


Increase Your Intake of Riboflavin (Vitamin B2)

Riboflavin, also known as vitamin B2, plays a critical role in energy production. It helps the body convert carbohydrates and fats into usable energy, allowing you to power through intense workouts and support muscle development.

Studies suggest riboflavin also contributes to endurance, making it especially important for high-intensity or long-duration training sessions. Since women tend to lose riboflavin more quickly during endurance workouts, maintaining adequate intake is crucial.

Foods rich in vitamin B2 include lean meats, eggs, milk, and green leafy vegetables. In some cases, supplements may be helpful, but it’s best to consult a healthcare professional before adding them to your routine.


Make Leafy Greens a Daily Staple

Leafy greens should be the bulk of what you’re eating when trying to put on more weight. Many people don’t realize its importance because they usually think of eating meats and fats to bulk up.

Leafy greens have Riboflavin, which we discussed above, but they also have several other supplements that women need extra to get that muscle on.

Folate is one of the essential vitamins in leafy greens. Women have folate deficiency more than men do. If a woman is pregnant and isn’t getting enough folate, the child can have neurological health issues. On top of that, you will feel like you have a lot more energy.

Doctors recommend that women should take more than the recommended daily intake (RDI) already but do things like eating raw fruits and veggies, drinking orange juice in the morning, and taking supplements to keep their folate going.

Green vegetables are a healthy way to get carbohydrates as well. Broccoli has vitamin C, which helps to keep you healthy. All green vegetables will help you gain mass without gaining a lot of fat in the process – women hold fat a lot more than men do, so this is also important.


Add Soybeans and Soy-Based Foods

Soybeans (including tofu) are also incredibly important for you to include in your diet if you’re a female bodybuilder.

One of the biggest reasons is that they are known for keeping you as healthy as possible. They prevent issues like heart disease, so you know that you’ll be beneficial when it comes to you as you get older.

Another reason to have soybeans is that they are an excellent form of protein. Even though other beans will give you some protein, soybeans are chock full of them, so you know that you’re getting enough in your body to help you bulk up.

Proteins can help you to get that muscle in your body, and they also help you to maintain energy throughout a workout and the rest of the day. If you’re a vegetarian, it can also help to increase the iron that your body needs, which we will discuss more in the next section.


Focus on Iron-Rich Foods

Iron deficiency is a huge problem that many people deal with regularly. Because of that, bodybuilders end up needing even more. Why?

Because if you don’t get enough iron daily, you will feel exhausted all of the time. Your energy levels will not be where they need to be, which will make it difficult for you even to get started on a workout. Iron is also essential because you aren’t able to push yourself as much if you don’t have enough in your system.

Your endurance is going to start to fall apart, and you’re not going to be able to do the high-impact training that you need to do in order actually to get some bulk on. And, as with many issues that occur with deficiencies, women will be a lot more likely to fight off the deficiency issues.

Of course, then comes the question of what you must do if you are a vegetarian. The obvious answer to what you should eat to get enough iron is that you should eat red meat. Make sure it’s lean because you want muscle, not fat, on your body.

Lentils, a bean, is another thing you can add to your diet to get iron in your system. You can also consider getting cereals fortified with iron, soybeans, green vegetables (which we discussed above), brown rice, and a number of other foods. Find what you like and add those things to your diet ASAP.

Your diet is a huge part of bodybuilding, so you want to ensure you’ve got everything together.

That being said if you’re going to change your diet, make sure that you talk to your doctor or another health professional who can keep an eye on you if potential issues come up at any time.

Is Cardio Bad for Building Muscle? What You Need to Know

Is Cardio Bad for Building Muscle? What You Need to Know


Is Cardio Bad for Building Muscle? What You Need to Know

Many clients who aim to get leaner — meaning they want to lose body fat while maintaining or building muscle — often ask whether cardio should be part of their workout routine.


The benefits of cardio are fairly clear:

  • It increases overall calorie burn, which supports fat loss

  • It improves cardiovascular health and endurance

  • For some people, cardio can actually be enjoyable (though not everyone would agree)

Despite these benefits, cardio is often criticized because it’s believed to interfere with muscle growth and strength development.


So, is cardio really harmful to your gains?

Several studies on beginners show that untrained individuals can improve strength and build muscle while combining resistance training with cardio. However, results seen in beginners don’t always apply to people who already have training experience. As your body becomes more adapted to resistance training, balancing cardio and muscle growth becomes more complex and requires a smarter approach.


In a research study, 30 resistance trained men were divided into four groups and they completed a 6 weeks training program, during which they trained three times a week or didn't train at all (control group).


One group did only strength training. The second did strength training three times a week and endurance training once week. The third group did strength training and endurance training in every session. And the fourth group did not train at all. The strength training program implemented a whole body training routine using compound movements and the form of endurance training was treadmill running.


At the end of the study, the strength training only group and the group that had only one cardio session a week in addition to strength training, had the highest lower body strength increases. In contrast, the group that did cardio after every session gained significantly less strength than the other strength training groups.


Upper body strength increased similarly in all training conditions. While lower body power, measured as the jump height participants could reach, increased only in the strength training group that did no cardio.


What we can learn from this study is that endurance training has the highest negative effect on power gains. If you are an Olympic weightlifter or do any other sports for which power is important, then you should avoid cardio as much as possible. (Side note: Power sports are those in which you have to do strong, fast movements. In contrast to the widespread belief, powerlifting is NOT a power sport because you can't lift very heavy weight fast.)


The more endurance training you do, the less strength you gain. However, the interference between endurance and resistance training is a local process. For this reason, running for instance, doesn’t affect your upper body strength gains (except when running makes you so tired, that you can lift properly or don't eat enough so that your body uses muscle as fuel). However, if you want to gain lower body strength, you should ideally choose a form of cardio that doesn’t involve your legs; arm ergometer for example.


Also, if you want to maximize your gains, you should perform your endurance and resistance training in different training sessions. In an ideal case, on different days. The worst thing you can do is train legs and do treadmill running straight after your leg workout!


If you are interested in muscle size gain (muscle hypertrophy), then I have good news for you. Muscle hypertrophy is more related to strength than it is to power. For this reason, I expect a similar or maybe even less interference between endurance training and muscle gain compared to endurance training and strength gain. However, the guidelines I have given above for performing cardio and strength training on different days and using the muscle groups you don't need to grow for cardio still apply.


Top 4 Safe and Natural Teething Remedies for Babies

Top 4 Safe and Natural Teething Remedies for Babies


Top 4 Safe and Natural Teething Remedies for Babies

Teething discomfort is a very common issue experienced by babies when their first teeth begin to push through the gums. This stage usually starts when babies are around 6 to 8 months old, although it may vary from one child to another.

During this phase, babies often feel pain and irritation, which can make them cry frequently, become unusually fussy, and refuse to eat. Common signs of teething may include excessive drooling, a strong urge to bite or chew, mild fever, cold-like symptoms, reduced appetite, sleep disturbances, rubbing of the cheeks or chin, crankiness, and sometimes mild diarrhea.

Teething can be a challenging period not only for babies but also for parents. Watching your little one in discomfort can be stressful, and many parents wonder if there are safe and effective ways to ease their baby’s pain. The good news is—yes, there are several gentle home remedies that can help soothe teething discomfort while also giving parents some peace of mind.

Home Remedies for Teething Pain Relief

Below are simple and natural methods that can help relieve your baby’s teething pain without causing harmful side effects. Take a look at these remedies and use them to help reduce your baby’s discomfort and make this phase easier for both of you.


Remedy – 1: (Cold)

Applying something cold will numb the gums and soothe the teething pain effectively. Here are some ways to give your baby a frozen effect for their teething pain.

  • Freeze a clean washcloth and give it to your babies to chew them, which help to reduce swelling by numbing the area.
  • For babies those who has lack of appetite should be feed with some soft and cool foods like homemade yogurt (probiotic help for healthy gut), applesauce, chilled pieces of fruits and vegetables (like banana, apples, carrots, cucumber, celery, plum, etc. if your baby starts eating solid foods).
  • Wrap 1 – 2 ice cubes in a muslin cloth and tied properly. Give it to your baby to suck on these ice cubes.
  • Fill your baby’s bottle with water and refrigerate it for few minutes. The cold from the nipple of the bottle along with cool water will help to relieve their teething pain.
  • Refrigerate (not in a freezer) a metal spoon for few hours and put it on your baby’s gums to soothe the teething pain. This method is recommended by the American Dental Association for treating the baby’s teething problem.
  • Fruit pops or vegetable juice pops will help to reduce the gum irritation and strengthen the baby’s immune system. Mix 1 cup each of fresh carrot and beetroot juices and pour it into ice pop molds (prefer with handles). Refrigerate it to freeze and remove it from the mold and give it to you baby to calm them.
  • Never ever give your baby any frozen thing, as the contact with an extreme cold may cause some harm to their gums.


Remedy – 2: (Massage)

A simple massage with gentle pressure on the gums will help to soothe the baby’s teething pain and calm your fussy baby. Here are few ways of massaging their gums to soothe the teething discomforts.

  • Rub all over the baby’s gums with your clean fingers using a gentle pressure for a minute. Initially, the baby resists it but they feel better while doing this massage. Rub it smoothly but not vigorously.
  • Ginger acts as an anti-inflammatory that relieves the gums pain. Rub a small piece of ginger on your baby gums for few seconds.
  • A vanilla extract helps to calm the nerves. Use it to rub the baby’s gums gently for a minute or two.
  • The almond extract helps to soothe the pain. Stir few drops of almond extract in little water. Apply it on the baby gums and rub it gently to get rid of the pain and inflamed gums.
  • Use some breast milk to rub on your baby’s gums for pain relief.

Note: Also, massage your baby’s face and jaw area in circular motions simply with your clean hand to give relief from outside.


Remedy – 3: (Chamomile)

Chamomile is an herbal remedy that widely used to soothe the baby’s teething pain. It calms and relaxes the nerves with its anti-inflammatory property. Here are few ways of using this chamomile for teething pain.

  • Prepare a weak chamomile tea and freeze it in ice cubes tray. Then place this frozen tea cubes into a securely tied muslin cloth or mesh teether. Give it to your baby to gnaw on the bag.
  • Give your baby 1 teaspoon of cool chamomile tea for every 4 – 5 hours.
  • Simply rub with a clean finger that dipped in chamomile tea (or chamomile tincture) on your baby gums to get rid of the pain.
  • Mix 2 – 3 drops of chamomile essential oil in 1 tablespoon of carrier oil (olive or coconut oil) and use a little mix to rub it on your baby’s gums, jaws and around the ears.
  • Soak a clean washcloth and freeze it after wringing out excess water. Give it to your baby to gnaw on the cloth which helps to numb their painful area.
  • Or you can use other herbs like rosehip, cloves or catnip, etc. for curing your baby’s teething pain.
  • For kids above 1 year, use diluted clove oil to reduce their sore gums due to its analgesic and anti-inflammatory properties. Mix 1 tablespoon each of coconut oil, olive oil, dried chamomile flowers and whole cloves in a pan. Heat it on low for 10-15 minutes and strain it. Use the clove oil mix to massage your baby’s gums.


Remedy – 4: (Baby Teethers)

Teether will give a comfort for your baby to gnaw on, as they give relief from the gums pain and pressure. But the only thing you should remember is that the teethers should not possess toxic ingredients like certain ingredients like polyvinyl chloride (PVC), Bisphenol A (BPA), latex, phthalates, lead, etc.

  • Choose a teether that made of a wood or silicon or rubber (but not plastic) for your baby and your baby can easily hold these teethers. Also, there are some teething jewelry for moms like teething bling, made of FDA approved silicone for their babies.
  • Also, use a solid or liquid-filled teether by placing it in the refrigerator for 15 – 20 minutes. for best results, always offer a chilled teether to your baby.
  • There are some silicone teething necklace or amber jewelry like necklace, bracelet or anklet has been popular in recent years. Succinic acid in Baltic amber has an analgesic property that relieves pain but you should take some care while using these products.


Tips and Precautions:

  1. Breastfeeding your baby will give relief from gums pain, as breast milk has a unique balance of nutrients that help the baby to recover faster.
  2. Distract your baby from teething pain by giving them a warm water bath, cuddle time, playing with them outside or a short stroll, etc.
  3. Wash the teethers or cloth toys regularly, as the baby’s use them to chew and if not washed properly then it might cause some health problem.
  4. Consult the child’s specialist for treatment, if your baby’s teething problem is severe and suffering from symptoms other than pain and fever.
  5. Always keep a clean cloth handy to clear your baby’s chin from excess drooling (a common symptom of teething) to get rid of skin irritation.
  6. In sometimes, foot reflexology also helps to soothe your baby’s teething discomfort. Rub some warm oil on the baby’s foot gently for 2 – 3 minutes.

Have you tried any of these teething methods? Do you know any other teething remedies? Then share it with us in the below comments section.


Easy DIY Sugar Wax Recipe for Silky, Hair-Free Skin

Easy DIY Sugar Wax Recipe for Silky, Hair-Free Skin


Easy DIY Sugar Wax Recipe for Silky, Hair-Free Skin

Sugar waxing has been practiced for centuries in the Middle East as a natural way to remove unwanted body hair. Today, it’s gaining popularity worldwide as an effective and gentle alternative to traditional waxing.

The best part? You don’t need to spend money or time at salons—sugar wax can easily be prepared at home using simple ingredients you already have in your kitchen.

If you’ve tried making sugar wax before but ended up with the wrong consistency, don’t worry—you’re not alone. Many beginners face this issue, but with the right recipe and method, you’ll achieve salon-quality results at home.

While shaving is a quick fix, it doesn’t remove hair from the root. This often leads to dark spots, razor bumps, irritation, and the need to shave frequently. In contrast, sugar waxing pulls hair from the root, giving smoother skin that lasts longer—without the same risks of ingrown hairs or harsh skin reactions.

Unlike regular wax, homemade sugar wax is less sticky, less painful, and leaves skin feeling soft and healthy. 


DIY Sugar Wax Recipes:

If you’re ready to try a safe, natural, and budget-friendly solution for hair removal, here are some of the best DIY sugar wax recipes you can make and use at home.


Method – 1: (Sugar Wax without Strips)

This method helps you to remove hair without using strips. Here we use lemon juice, sugar, water and guar gum in which lemon juice prevent sugar from crystallizing and guar gum makes this paste more elastic and pliable.


Preparation Steps:

  • Pour 1 cup of white sugar in a saucepan which is placed on the stove over medium-low flame.
  • Then add 2 teaspoons of fresh lemon juice (or 1/4 cup) and 1/5 cup of water in it.
  • Stir well until the sugar dissolves and turns into a golden syrup.
  • Turn off the heat and stir it by adding 1/2 teaspoon guar gum and squirt a thin layer of water on the baking pan.
  • Pour this syrup on it with a spoon and start scraping the syrup from all the edges towards the center to cool the mix and solidify it.
  • Do it till the ball of sugar wax is formed and then start stretching and pulling it by wetting your hands occasionally for 10 – 15 minutes.
  • This process will make the ball stretchy and pliable and store it in a clean jar and refrigerate it for up to 2 months.


How to Use:

  • Wash and dry the area where you want to use this sugar wax.
  • Then dust the area with either corn starch or baby powder to ensure that the sugar sticks to the hairs.
  • Take your sugar ball and stretch it on a small area of the skin in the opposite direction of hair growth
  • Wait for 7 seconds and pull off in the same direction of the hair growth.
  • Continue this process till you are done with all the areas and moisturize the skin with some natural moisturizers to enjoy hairless smooth skin.
  • You can use this sugar wax for 3 – 4 times until it loses the firmness and also remember that not to use this wax recipe for removing facial hair.

Note: 

  • In this recipe, lemon juice is used to bind the ingredients and prevent sugar from crystallizing but for certain reasons like sensitive skin, irritating and making your skin photosensitive. So, prepare wax recipe by using vinegar instead of lemon juice and add few drops of lavender oil and avoid using guar gum to it.
  • If you want, you can also add a pinch of salt to this sugar wax recipe.


Method – 2: (Sugar Wax Recipe with Strips)

This makes use of strips to remove the hair from the roots. It also uses three simple ingredients – sugar (prefer white sugar), lemon juice and water.


Preparation Steps:

  • Pour 1 cup of sugar and 1/4 cup of water in a pan and stir well until the sugar melts.
  • Then add 1/4 cup of fresh lemon juice and stir it on medium flame till it turns to golden brown color.
  • Turn off the flame and leave the wax to cool completely.
  • Store it in a glass jar for regular usage.


How to Use:

  • Before starting this waxing, you have to dust some cornstarch or talcum powder on the skin to clear the oil or dust from the skin.
  • Then spread this sugar mix on the skin by using a Popsicle stick or butter knife.
  • Now press a waxing strip on it and pull it in the opposite direction of hair growth.
  • Finally, rinse your skin with cold water and use a moisturizer or aloe vera gel to prevent redness on the skin and to make it smooth.


Tips and Precautions:

  1. For best results, you have to take a hot shower along with a bit of sugar scrub to exfoliate the areas where you want to use this wax. Apply it after you dried your skin thoroughly.
  2. Remember that not to apply any lotion 24 hours before on the skin where you want to remove the hair.
  3. Also, reheat the mix using a microwave or placing the jar in a boiling water to remove the hair from the roots.

Try these natural sugar wax recipes to remove the unwanted hair from the root. Do you know any other successful homemade sugar wax recipes? Then share it with us in the comments box.

What Are The Best Times Of The Day To Drink Water?

What Are The Best Times Of The Day To Drink Water?

What Are The Best Times Of The Day To Drink Water


The majority of us are aware that drinking water on a daily basis is crucial for maintaining our health and well-being. There are numerous ways to satisfy your thirst, including ice-cold, hot, and fruit-infused options. However, did you know that the times you choose to drink water can affect how it affects your body? Join us as we break down the top five times of the day to drink water so you can meet your hydration goals.


The Best Times to Drink Water in a Day to Maintain Optimal Hydration


1. Right When You Wake Up

Start your day off right with a big glass of H2O. Because you can’t drink water while you’re sleeping, you wake up dehydrated. Not only will drinking water every morning help satisfy your thirst, but it will make it easier to sustain healthy hydration habits in the long run. Plus, it can help to improve your mood, brain function, and energy levels.


2. Before and During a Meal

Drinking a cup of water before a meal can aid with weight loss because it can help you feel fuller and prevent overeating. On the other hand, drinking water with your food aids digestion, especially with high-fiber foods.


3. Midafternoon to Avoid the Slump

Lacking energy around 3 pm? Instead of reaching for another cup of coffee, grab a bottle or glass of water. Consuming caffeine six hours before bed can disrupt your sleep, which can affect your mood the next day. Dehydration may be the root cause of this midafternoon slump, so drinking water can help combat fatigue and other unwanted symptoms.


4. Before, During, and After Exercise

Suppose you are prepping for a rigorous workout or active event. In that case, you should regularly drink water in the days leading up to the performance vs. consuming lots of water immediately before to avoid bloating. For moderate workouts, try to drink a cup of water 30 minutes prior to starting. Since you lose water and electrolytes through sweat, you should sip on water during and after your workout to keep your body hydrated and replenish any lost fluids.


5. When You Have a Headache or Migraine

Headaches and migraines are no fun, especially if they occur on a daily basis. A headache can be a common symptom of dehydration, so drinking more water can be the key to some relief. Dehydration is also a common trigger for migraines, so increasing your water intake may help decrease migraine severity, frequency, and duration.

With these recommendations in mind of the best times to drink water in a day, set yourself up for success in your routine. Implementing these small changes can make a world of difference in the long run!


Best Natural Remedies to Eliminate Foot Odor Fast

Best Natural Remedies to Eliminate Foot Odor Fast

Best Natural Remedies to Eliminate Foot Odor Fast


For those who experience it, foot odor, sometimes known as stinky feet, is a truly humiliating issue. Sweat and bacteria are usually to blame since they produce a moist environment that makes it easy for bacteria to grow and cause foot odor.

Sweating from wearing shoes or socks for an extended period of time causes bacteria that are naturally found on the skin to feed on the perspiration and dead skin cells, which results in the unpleasant odor coming from your feet.

Additional factors that contribute to foul-smelling feet include inadequate personal cleanliness, athlete's foot, specific drugs, hormonal fluctuations, tight and uncomfortable shoes, stress, hyperhidrosis, alcohol or tobacco use, inadequate foot ventilation, etc.

You can quickly get rid of this foot odor, so stop fretting. Sweat and bacteria are usually to blame since they produce a moist environment that makes it easy for bacteria to grow and cause foot odor.


Home Remedies for Feet Odor:

The listed below are the best natural home remedies that effectively helps you to get rid of stinky feet. Let’s get started.


Remedy – 1: (Foot Soaks)

Soaking your feet in warm water will kill the bacteria and also clears sweat causing foot odor. Here are few best foot soaks that kick out the odor-causing culprits.


Method – 1: (Epsom Salt)

Epsom salt or magnesium sulfate fights against the microbial infection to neutralizes the foot odor and also relaxes your aching feet. Salt pulls out the moisture and reduces the bacterial action.

  • Mix 1/2 cup of Epsom salt in 8 cups of warm water.
  • Soak your feet for 20 – 30 minutes and dry your feet thoroughly.
  • Repeat 1 – 2 times daily. For effective results, do this soaking once at night before bedtime.

Note: Or use kosher salt instead of Epsom salt in this soak to get rid of smelly feet.


Method – 2: (Sage and Rosemary)

Sage and rosemary herbs have antibacterial, antifungal and astringent properties that minimize the production of sweat from your sweat glands. Hence less sweat means less odor.

  • Fill your foot basin with boiling water and add 1 teaspoon of dried rosemary and 1 – 2 teaspoon of dried sage in it.
  • Stir well and let the water reaches warm but not hot to place your feet.
  • Then soak your feet for 30 minutes and rinse off gently.
  • Continue doing this process for 1 – 2 times daily.

Note: Also, soak your feet in sage tea for 10 – 15 minutes (or) drink 1 – 2 cups of sage tea at night before bedtime (or) place dried sage powder inside the shoes and socks to prevent foul smell and to have a nice green scent.


Method – 3: (Baking Soda)

Baking soda is an amazing ingredient that works like a miracle on the applied area. It controls the foot odor, neutralizes pH levels and kills the bacteria and thus softens your feet.

  • Add 1 tablespoon of baking soda in 1 quart of warm water.
  • Mix well and soak your feet in it for about 15 – 20 minutes at night before bedtime.
  • Continue doing it daily for a week.

Note: Or lemon acts as an astringent that prevents excessive sweating causing foot odor. Mix 1/4 cup of baking soda and fresh lemon juice from 1 lemon in 8 cups of warm water. Swish and soak your feet for 15 – 20 minutes and then dry your feet.


Method – 4: (Apple Cider Vinegar)

Apple cider vinegar has acidic nature that makes your skin unfriendly for the bacteria to thrive in and create odor. It also makes your feet feel fresh and relaxed. You can use any type of vinegar but apple cider vinegar gives faster results.

  • Fill your foot basin with 5 – 8 cups of warm water.
  • Mix it with 1/2 cup of organic apple cider vinegar in it.
  • Submerge your feet and stir it well.
  • Soak your feet for 15 – 20 minutes and then rinse off your feet with cold water to close the pores and to get rid of the vinegar smell.
  • Re-soak your feet for twice daily with a freshly prepared mix.

Note: Or clean your feet with a cotton ball dipped in ACV mix.


Method – 5: (Black Tea)

Black tea has a rich amount of tannic acid that provides an unfriendly environment for bacteria and also this tea acts as an astringent that contracts sweat glands and reduces the foot odor.

  • Fill your foot basin with 4 – 5 cups of boiling water.
  • Then add 5 black tea bags in it and let it steep for about 10 minutes.
  • Soak your feet in this black tea water for 20 – 25 minutes.
  • Repeat it once daily and dry your feet thoroughly after every soak.


Method – 6: (Lavender Oil)

Lavender essential oil has antifungal and antiseptic properties that eliminate the bacteria causing foot odor. It has aromatherapy that prevents the smelly feet along with the sweat.

  • Pour few drops of lavender essential oil in your foot basin filled with warm water.
  • Soak your feet in this basin for about 15 – 20 minutes.
  • Continue this process for twice daily till you get complete relief from foot odor.

Note: Also, use tea tree oil or peppermint oil or any essential oil in the place of lavender oil in it.


Remedy – 2: (Alum Rinse)

Alum powder has antiseptic and astringent properties that inhibit the growth of bacteria and prevents foot odor.

  • Add 1 teaspoon of alum powder in 1 cup of warm water.
  • Mix well and rinse your feet with this solution.
  • Leave it for 15 – 20 minutes and after that, dry your feet.
  • Sprinkle some alum powder on your feet and leave it like that.
  • Repeat the same process for once daily till you get relief from foot odor.


Remedy – 3: (Sugar Scrub)

A Scrub will help to remove dead skin and calluses which in turn eliminate foot odor. So, the regular scrub will not only clean your feet but also prevent the formation of calluses. Here is the homemade DIY scrub for foot odor.

  • Mix sugar, isopropyl alcohol, and clean water in such a way that for 1 part of isopropyl alcohol, mix 5 parts of water and also use more of sugar than water to get a thick paste.
  • Soak your feet in warm water for few minutes to make the skin soft for proper scrubbing.
  • Use this scrub mix to scrub your feet for 5 – 7 minutes to get rid of bacteria, sweat and dead cells.
  • Then wash your feet with water and dry it properly.
  • Continue this scrubbing for 3 times a week till you get relief from smelly feet.

Note: If you have broken skin or suffering from eczema, then avoid using the scrub.


Remedy – 4: (Ginger)

Ginger has antimicrobial, antioxidant and skin soothing properties that inhibit the bacterial growth and thus removes toxins from the feet to get rid of stinky feet.

  • Prepare a puree from a medium sized ginger root.
  • Let it steep in 1 cup of hot water for 10 – 15 minutes.
  • Then strain the mix to extract smooth liquid.
  • Use it to massage your feet gently at night before bedtime and leave it on for overnight.
  • Do this massage daily for few weeks to get rid of stinky feet.

Note: Or grind some ginger to get a smooth paste and apply this paste to your feet. Rinse off with warm water after 15 minutes.


Tips and Precautions:

  1. Sprinkle some baking soda or cornstarch or talcum powder or arrowroot powder on your feet, shoes and socks to get rid of sweat and thereby odor.
  2. Never ever wear a same pair of socks daily. It’s best to change the socks and shoes to get rid of the odor. Also, wash your socks and dry your shoes regularly to prevent bacteria or sweat causing foot odor.
  3. Wear open toed shoes or sandals (if possible) to make the feet breathe in and to prevent sweat. Also, avoid wearing shoes or shoes at home.
  4. Have some cotton socks rather than synthetic material in socks which help your feet to observe sweat and allow the feet to breathe properly.
  5. Borax acts as a disinfectant that prevents odor causing bacteria. Simply mix 1/2 cup each of borax and vinegar in 2 cups of water. Pour it a spray bottle and spray it inside the shoes (or) dust some borax powder inside the shoes before wearing to get rid of sweat and thereby smelly feet.
  6. Drink plenty of water, reduce foods (like refined carbohydrates, balance proteins, healthy fats and complex carbohydrates), include zinc-rich foods (like red meat, wheat germ, spinach, nuts, beans, oysters, cocoa or chocolates), etc. will help to get rid of smelly feet.
  7. Practice yoga, deep breathing and meditation to get rid of stress, as stress also causes smelly feet.
  8. Soak your feet in warm water by adding either few drops of Listerine mouthwash (or) oatmeal (or) vodka (or) few drops of thyme oil will help to get rid of smelly feet.
  9. Regularly remove the dead skin and massage your feet with some natural moisturizer to get rid of foot odor.
    Quit smoking and limit your alcohol content to prevent the smelly feet.
  10. Consult your doctor if you’re still suffering from this problem after a week or having excessive sweating for proper diagnose and treatment.

This is all about Natural Remedies to treat Foot Odor. Try these remedies at home and share your experience with us in the comments box.


14 Surprising Facts About Human Body that you Should Know

14 Surprising Facts About Human Body that you Should Know

14 Surprising Facts About Human Body that you Should Know


You admire your appearance, clothes, and hair when you glance in the mirror. Do you ever consider the functioning of the body you see in front of you? Since they have always been a part of who you are, your eyes, hands, hair, tongue, legs, and even your eyebrows may appear extremely generic to you. 


However, there's a lot more than meets the eye. We cannot even begin to comprehend the vast number of components that make up the human body and how scientifically it operates.

Since Earth is the only planet where humans live, it is fascinating to examine how our bodies function and how each organ works together to carry out different tasks. You may be aware of the strongest muscle, the number of bones, etc., but you would be surprised to learn many additional facts. 


So let us begin reading some interesting facts about our body:

  1. Have you ever noticed the flexing muscle on your biceps, it looks like something is moving under your skin? Well, that is the reason why it is called muscle as it is derived from the Latin word ‘musculus' which means little mouse and that is what Romans thought about the flexed skin.
  2. A person spends around five years of his life eating.
  3. Do you ever wonder about the importance of the little finger in your hand among the palm and other fingers? Well, your pinky finger holds the 50 percent strength of your hand.
  4. Here is one more unbelievable fact, blood runs the total distance of 29,312 kilometers in your body.
  5. You know your eyes can differentiate between as many as 10 million colors, but your brain remembers just a few of them. Also, your nose can identify 1 trillion smells.
  6. Another interesting fact is that your nose and ears regularly grow from the time you were born till you die but the size of your eyes always remains the same.
  7. Our skin sheds dead cells almost every minute, i.e., 30,000 to 40,000 cells per minute which are equal to one million skin cells in a day. So, every year a human body loses more than 8 pounds in a year.
  8. You might be surprised to hear that you are 1 centimeter taller in the morning than in the evening.
  9. If you spread blood vessels of a child end-to-end, then it can cover around 60,000 miles which is almost 2.5 miles around the world. In case of an adult, it would be 100,000 miles.
  10. In our whole body, the cornea is the only part with no blood supply and gets oxygen directly from the air. It is also the fastest healing tissue as the corneal abrasions can be healed within 24 to 36 hours.
  11. It is commonly known that 75 percent of your body is water but do you know that 80 percent of your brain is water too.
  12. Most Caucasian babies are born with blue or gray eyes due to no melanin. But when the melanin gets enough time to build up and due to exposure of Sun, eyes change to its real color.
  13. A human skeleton takes ten years to renew itself. So, after every 10 years, you have a new skeleton.
  14. And the most shocking one is, a human body can survive even after you remove the stomach, spleen, one kidney, 75 percent of liver, one lung, 80 percent of intestines, and every organ from pelvis and groin area.

These were the only few out of many interesting and fun facts of the human body. If you ever search or read articles and blogs about them on the Internet, you will be left wondering all the more, and it would make your study of science even more amazing.