How to Make a DIY Cucumber Face Mask for Cool, Hydrated, Radiant Skin

How to Make a DIY Cucumber Face Mask for Cool, Hydrated, Radiant Skin


How to Make a DIY Cucumber Face Mask for Cool, Hydrated, Radiant Skin


If you're searching for an easy homemade skincare treatment, a DIY cucumber face mask is an excellent choice. This natural remedy is loved for its cooling effect, hydrating properties, and ability to leave the skin looking fresh and radiant. Best of all, it only requires a few simple ingredients that you may already have in your kitchen.


Cucumber is a popular ingredient in natural skincare thanks to its high water content and refreshing sensation. It helps provide an instant cooling effect while supporting the skin's natural moisture balance. When blended with nourishing ingredients like plain yogurt, fresh aloe vera gel, and raw honey, it creates a gentle face mask that leaves your complexion feeling soft, soothed, and revitalized.


Whether your skin feels dry after spending time outdoors, looks dull from everyday stress, or simply needs a little pampering, this homemade cucumber face mask can be a relaxing addition to your weekly skincare routine. Its lightweight, natural ingredients work together to help your skin feel hydrated, refreshed, and healthy without relying on harsh chemicals.


Adding this DIY treatment to your self-care routine is a simple way to enjoy spa-like skincare at home while giving your complexion a naturally healthy glow.


Why Cucumber Is a Popular Skincare Ingredient

Cucumber is widely used in natural skincare because it contains a significant amount of water, making it an excellent ingredient for creating a refreshing sensation on the skin. Its lightweight nature makes it suitable for many skin types, especially during warmer months when the skin may feel overheated or dehydrated.


The cooling effect of cucumber can help make skincare routines feel more relaxing. This is one reason why cucumber slices are often associated with spa treatments and facial relaxation sessions.


In addition to its refreshing qualities, cucumber blends easily into smooth pastes and masks, making it ideal for homemade skincare recipes.


Important: Consistency often matters more than complexity in skincare. A simple routine using gentle ingredients regularly can be more effective than constantly switching between numerous products.


Benefits of a DIY Cucumber Face Mask

Homemade cucumber masks remain popular because they combine simplicity with a pleasant skincare experience. Here are some commonly appreciated benefits.


Cooling and Refreshing Sensation

The most noticeable benefit is the immediate cooling feeling. Applying a chilled cucumber mask can be especially enjoyable after spending time outdoors or during hot weather.


Supports Skin Hydration

Because cucumber contains a high amount of water, it contributes to a moisture-rich mask that helps the skin feel refreshed. Combined with ingredients such as aloe vera gel, the mask creates a soothing experience that many people enjoy.


Promotes a Healthy Glow

Well-hydrated skin often appears smoother and more radiant. Many people use cucumber-based masks before special occasions or as part of their weekly beauty routine to maintain a naturally refreshed appearance.


Encourages Relaxation

Skincare is not only about appearance. Taking ten to fifteen minutes to relax with a face mask can help create a calming self-care ritual that supports overall wellness.

 How to Make a DIY Cucumber Face Mask for Cool, Hydrated, Radiant Skin

The Power of the Supporting Ingredients

A cucumber mask becomes even more beneficial when combined with complementary ingredients. Each component contributes something unique to the mixture.


Yogurt

Yogurt creates a creamy texture that helps the mask spread evenly across the skin. It also contributes moisturizing properties that leave the skin feeling soft and comfortable after rinsing.


Aloe Vera Gel

Aloe vera is widely known in natural skincare for its soothing and hydrating qualities. It blends beautifully with cucumber and helps create a lightweight mask that feels refreshing on application.


Honey

Honey has been used in beauty treatments for generations. It helps add moisture and gives the mixture a smooth consistency while supporting a healthy-looking complexion.


Expert Insight

Combining hydrating ingredients often creates a more balanced skincare treatment. Cucumber, aloe vera, yogurt, and honey work together to provide moisture, comfort, and a refreshing sensory experience.

This simple recipe requires only a few ingredients and takes just minutes to prepare.

Ingredients

  • ½ fresh cucumber
  • 1 tablespoon plain yogurt
  • 1 teaspoon aloe vera gel
  • 1 teaspoon honey

Instructions

  1. Blend the cucumber into a smooth paste.
  2. Add yogurt, aloe vera gel, and honey.
  3. Mix thoroughly until the texture becomes creamy and even.
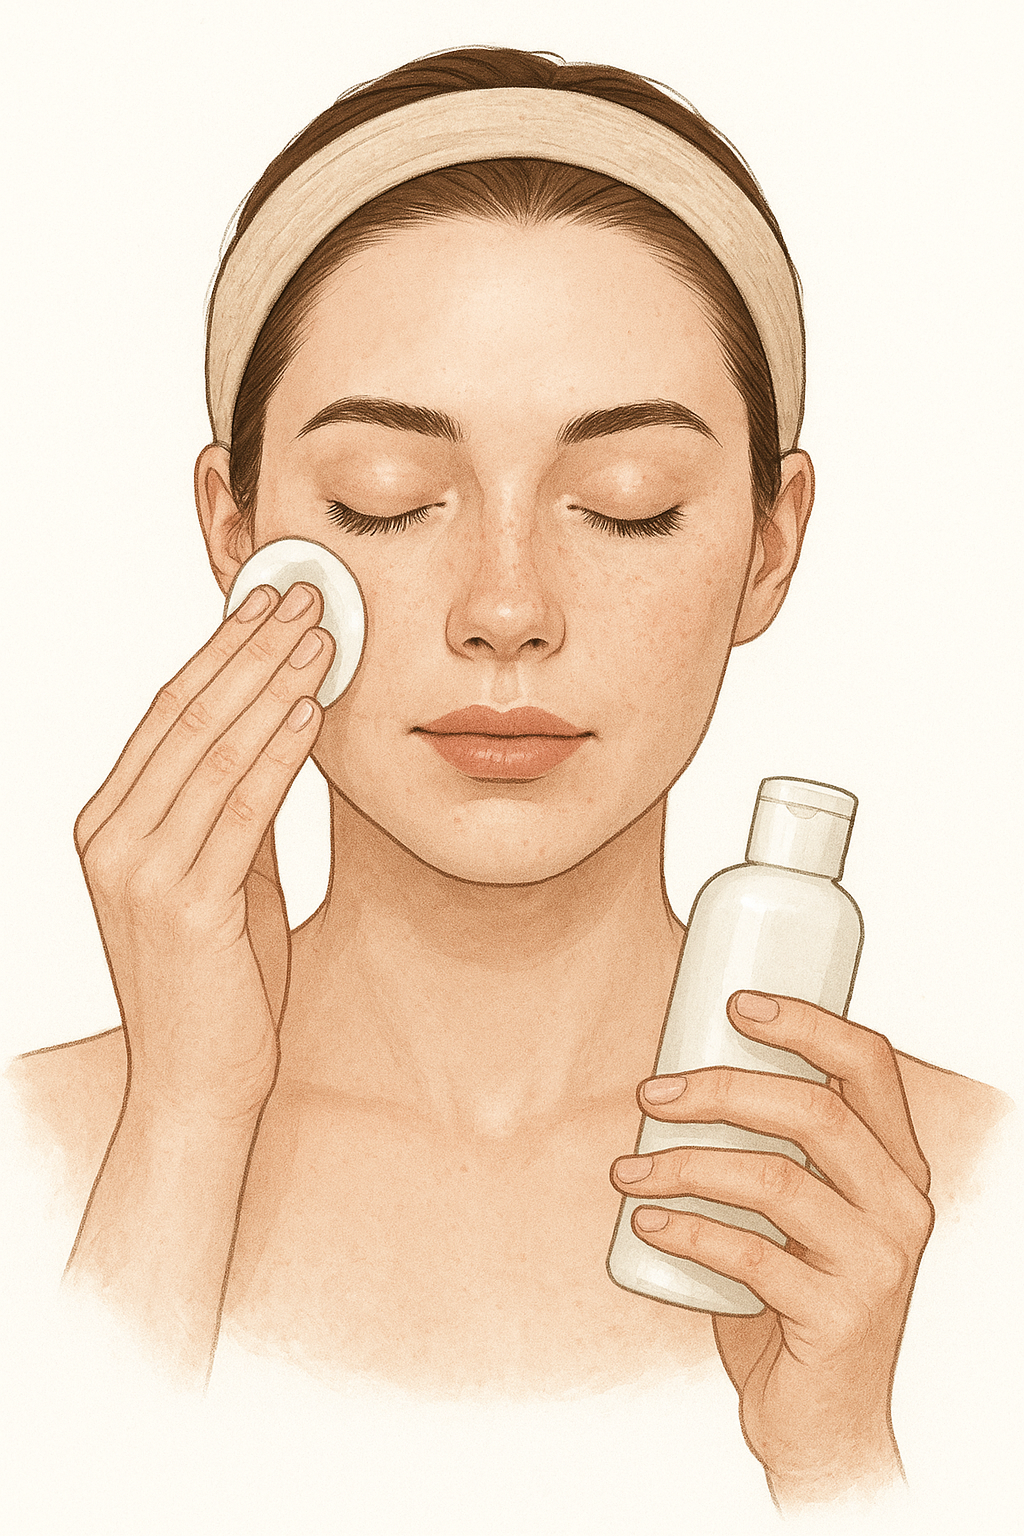
  4. Apply a thin layer to clean skin.
  5. Leave on for approximately 15 minutes.
  6. Rinse with cool water and gently pat the skin dry.

This recipe is ideal for a quick at-home facial treatment and can be prepared whenever your skin needs a refreshing boost.


Tips for Best Results

Making the most of your cucumber face mask involves a few simple practices.


Use Chilled Ingredients

Refrigerating the cucumber before preparation can enhance the cooling sensation and make the treatment even more enjoyable.


Start with Clean Skin

Always wash your face before applying any mask. Clean skin allows the ingredients to sit comfortably on the surface without interference from makeup or excess oil.


Apply Evenly

Use clean fingers or a facial brush to spread the mask evenly. This helps ensure a consistent experience across the face.

Pro Tip: Store prepared cucumber mask in the refrigerator for a short period before use. The cool temperature can make the treatment feel even more refreshing and spa-like.


Who Can Enjoy a Cucumber Face Mask?

One of the reasons cucumber masks remain so popular is their versatility. They fit into many different skincare lifestyles and routines.

  • People seeking a refreshing self-care treatment.
  • Individuals looking for simple DIY beauty ideas.
  • Those interested in natural skincare ingredients.
  • Anyone wanting a quick at-home facial experience.
  • People looking to support skin hydration and radiance.

The recipe is straightforward enough for beginners while still offering a pleasant skincare ritual for experienced beauty enthusiasts.


Creating a Complete Spa Experience at Home

A cucumber face mask can become the centerpiece of a relaxing self-care session. Transforming a simple skincare treatment into a mini spa experience requires only a few thoughtful touches.


Set a Relaxing Environment

Dim lighting, calming music, and a comfortable chair can instantly make the experience feel more luxurious.


Stay Hydrated

Drinking water while enjoying your skincare routine complements your overall wellness habits and supports healthy-looking skin.


Follow with Moisturizer

After rinsing the mask, applying a gentle moisturizer helps maintain the refreshed feeling and supports a comfortable skin barrier.


Common Mistakes to Avoid

Even simple DIY skincare recipes can benefit from proper application.

  • Avoid using ingredients that are no longer fresh.
  • Do not leave the mask on significantly longer than recommended.
  • Prepare small batches for freshness.
  • Always patch test new ingredients if you have sensitive skin.
  • Use clean utensils and containers during preparation.

Important: Natural ingredients can still cause irritation for some individuals. Performing a patch test before full application is a smart precaution when trying any new skincare treatment.


Why DIY Skincare Continues to Grow in Popularity

Many people appreciate DIY skincare because it offers transparency and simplicity. Homemade recipes allow individuals to know exactly what goes into their treatments while creating enjoyable self-care moments.

Natural ingredients such as cucumber, aloe vera, yogurt, and honey remain favorites because they are familiar, accessible, and easy to incorporate into beauty routines.

Beyond skincare benefits, DIY beauty projects can be relaxing and creative. Preparing a fresh face mask becomes more than a beauty task. It becomes a mindful activity that encourages slowing down and caring for yourself.

At a Glance

  • Cucumber provides a refreshing cooling sensation.
  • Yogurt contributes a creamy, moisturizing texture.
  • Aloe vera supports hydration and comfort.
  • Honey helps create a nourishing mask blend.
  • The treatment takes only about 15 minutes.


Conclusion

A DIY cucumber face mask is a simple yet enjoyable way to bring a spa-inspired experience into your home. Combining cucumber, yogurt, aloe vera gel, and honey creates a refreshing treatment that helps the skin feel hydrated, soothed, and revitalized.

Whether you are building a natural skincare routine, searching for easy homemade beauty ideas, or simply looking for a relaxing self-care activity, this cucumber mask offers an accessible option worth trying. With minimal preparation and familiar ingredients, it delivers a refreshing ritual that can leave your skin looking healthy, comfortable, and naturally radiant.


5-Minute Face Contouring Tutorial: Step-by-Step Guide for Beginners

5-Minute Face Contouring Tutorial: Step-by-Step Guide for Beginners


5-Minute Face Contouring Tutorial: Step-by-Step Guide for Beginners

Do you want beautifully sculpted features without spending hours blending and layering makeup? The good news is that contouring doesn’t have to be complicated or time-consuming. With the right approach, you can define your face in just five minutes.

Many people feel intimidated by contouring. With so many bronzers, highlighters, brushes, and online tutorials available, it’s easy to assume the process is difficult. The truth is, contouring can be simple when you focus on the essentials and use techniques that actually work.

By applying a few strategic strokes in the right areas, you can enhance your cheekbones, refine your nose, and create a sharper jawline almost instantly. The key is knowing where to place your product and blending it well for a natural finish.

In this guide, you’ll discover practical tips and expert tricks to help you contour your face quickly and confidently—even if you’re a beginner.

This article will show you exactly how to contour your face in 5 minutes, using easy steps that deliver professional-looking results.


Understanding Contouring

Contouring 🎨 is the art of sculpting and defining your face. By using shades slightly darker than your skin tone, you can create natural-looking shadows and accentuate your best features.

Choosing the Right Products

  • 🛍️ Creams: Perfect for a natural finish and easy blending.
  • 🛍️ Powders: Great for setting makeup and adding a more defined look.

💡 Pro Tip

If you’re a beginner, start with a cream-based contour stick or palette. They’re effortless to apply and blend seamlessly into your base makeup..


Finding Your Contour Zones

Knowing where to apply contour is crucial for a flattering result.

  • Focus Areas: Jawline, cheekbones, and nose are the key spots to define your face.
  • Pro Tip: Use natural light to identify the shadows on your face for guidance 🌞.

Prepping Your Skin

Healthy skin is the canvas for flawless makeup, so skincare is key 💆 .

Prep Your Skin
  • Routine: Cleanse, exfoliate, and moisturize for a smooth base.
  • Example: Double cleanse at night and moisturize daily for hydrated, glowing skin ✨.

Cream vs. Powder Contour 🌸

Your choice depends on skill level and the finish you want.

  • Cream Contour: Easier for beginners, blends seamlessly, and gives a natural look.
  • Powder Contour: Ideal for setting makeup and creating sharper definition.
  • Try This: A cream contour stick for precise, beginner-friendly application 🎯.

Step-by-Step Contouring Guide

Here’s how to contour different areas of your face 🪞:

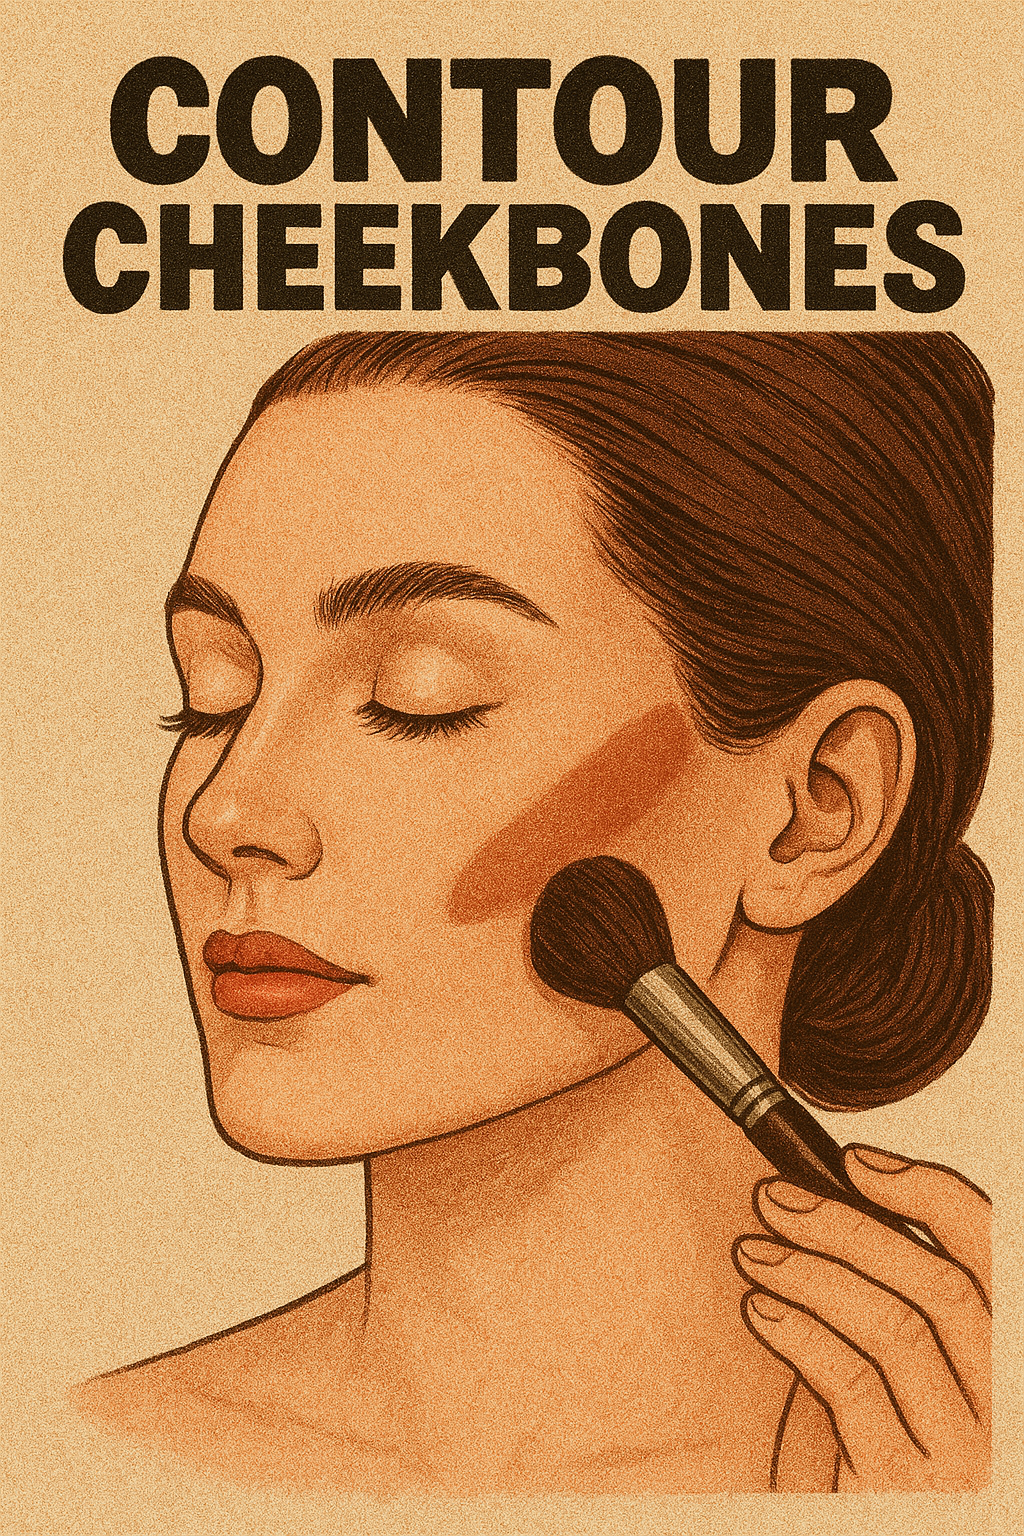
✨ Cheekbones

  • Visualize a line from your ear to the corner of your mouth.
  • Apply contour along this line and blend toward your hairline.
  • Use a brush or fingers to blend until seamless.

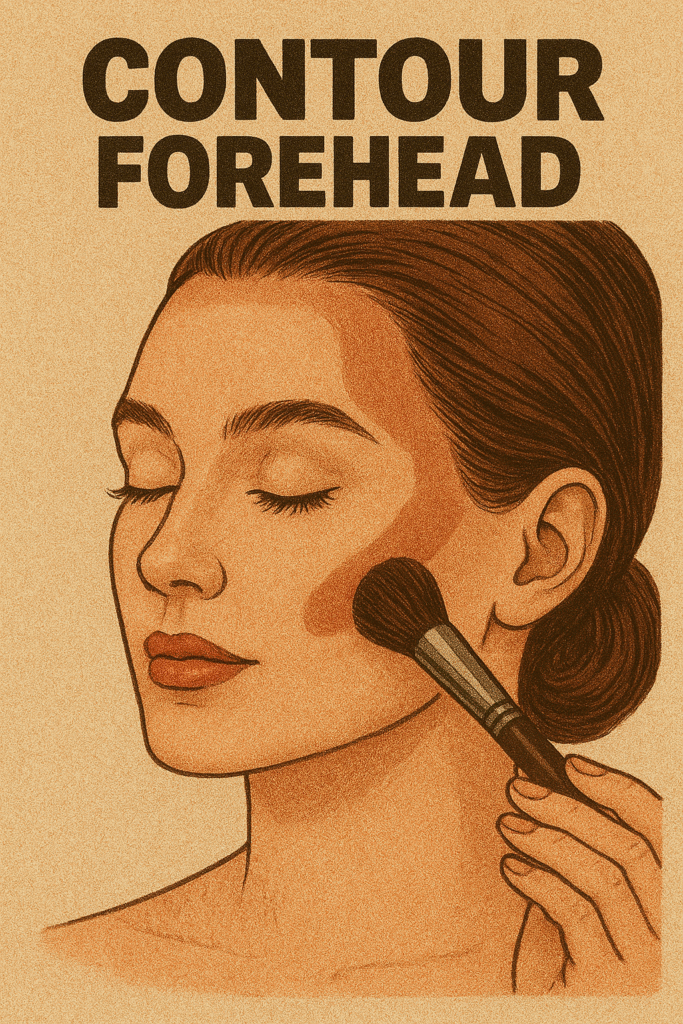
✨ Forehead

how to contour forehead
  • Dot contour along your hairline from temple to temple.
  • Blend in semicircular motions for a natural gradient.
  • Focus on the sides for a narrower effect.

✨ Jawline

  • Buff contour along your jawline to create subtle shadows.
  • Blend well for a sculpted but natural finish.

✨ Eye Area

  • Imagine a line from the outer corner of your nose to above your brow bone.
  • Apply contour along this line and blend upward 👀.
  • Extend slightly for a lifted effect.

🌟 Completing the Look

  • Highlighter: Apply to high points like cheekbones, brow bone, and nose bridge.
  • Blush: Sweep onto cheeks for a healthy, radiant glow 🌹.

🌿 Contouring at Any Age

Contouring isn’t limited by age — just adapt your technique as your features evolve.

  • Tip: Use contour to gently lift and define as skin changes over time.
  • Example: Softer application can enhance features while respecting skin’s natural texture 💕.

💄 Contouring is a versatile technique that enhances your natural beauty. With a little practice and the right products, you’ll master the art of sculpting in no time!

Simple Home Remedies to Solve Everyday Beauty Problems

Simple Home Remedies to Solve Everyday Beauty Problems


Simple Home Remedies to Solve Everyday Beauty Problems

Beauty problems related to skin and hair are something many of us deal with on a daily basis. From dull skin to hair fall, these concerns can affect confidence and overall appearance. While cosmetic products and beauty creams may offer quick results, frequent use often comes with unwanted side effects that can harm the skin or hair over time.


That’s why natural home remedies are becoming a popular choice. They are gentle, affordable, and made from ingredients that are easily available. Most importantly, they help address beauty concerns safely without exposing your skin or hair to harsh chemicals. Below, you’ll discover effective natural remedies designed to tackle common beauty problems the healthy way.


Problem – 1: Acne

Acne is an inflammatory skin problem caused due to clogging of hair follicles/skin pores with dirt, oil, and dead skin cells. It is characterized by pimples, blackheads, and whiteheads.

Remedy – Tea Tree Oil

Tea tree oil has terpinen – 4 – ol that exhibits antibacterial, antifungal and antiseptic properties that kill the acne causing bacteria. It penetrates deep into the skin to unclog the pores and prevents these acne blemishes, blackheads, and acne scars.

Steps to be followed…

  • Pour few drops of 100% pure tea tree oil onto a cotton ball.
  • Dab it on the acne affected areas and leave on for few minutes.
  • Rinse with water and continue this application 3 – 4 times daily.


Note: Or dilute few drops of tea tree oil in water (or carrier oil or aloe vera gel or honey or yogurt), if you’re having any stinging sensation after direct application of tea tree oil on acne.


Problem – 2: Sunburn

Sunburn is caused due to overexposure of the body to sun’s harmful ultraviolet rays, which results in redness, peeling and painful blistering of the skin, especially on summer season. It has to be treated on time, or else it leads to skin problems like dark spots, wrinkles, scarring, freckles, melanoma, etc.

Remedy – Aloe Vera

Aloe vera has many essential vitamins, minerals, enzymes and other trace elements that allow it to form a protective layer over burned and peeling skin. It also hydrates the skin by holding the moisture levels to prevent the pain and burning sensation.

Steps to be followed…

  • Cut a thick aloe vera leaf and open lengthwise.
  • Squeeze it to extract its gel from the leaf.
  • Apply this fresh gel on the sunburned skin areas using your fingers.
  • Let it sit for few minutes till it dries and gets absorbed into the skin.
  • Leave it like that or else rinse off with cold water, if you feel sticky.
  • Regular application of aloe vera gel for 2 – 3 times daily will cure the sunburned skin.

Note: Alternatively, use aloe vera juice instead of aloe gel (or) mix aloe vera gel with cucumber or lavender oil or yogurt or vitamin E oil to get quick relief from the sunburn.


Problem – 3: Skin Whitening

Who doesn’t love the flawless and gorgeous skin? Dark and uneven skin tone is a nightmare for most of the people. Pollution, harmful sun rays, unhealthy diet, harsh chemical based products, unhygienic skin care, etc. will increase the melamine production in the skin, which in turn, results in dark discolored skin tone.

Remedy – Gram Flour (or) Chickpea Flour

Gram flour is an excellent remedy that widely used in Asian countries to brighten up their skin tone. It controls the oil secretion and balances your pH levels with its alkalizing property. It exfoliates the skin to remove dirt, dead cells and toxins to replenish the skin and close the opened pores.

Steps to be followed…

  • Add 1 tablespoon of rice powder and 2 tablespoons of gram flour in a bowl.
  • Stir well by adding enough of milk till it forms a fine paste.
  • Apply it all over the skin and leave it on for about 15 – 20 minutes.
  • Wash the area with cold water and dry the skin thoroughly.
  • Repeat the same for 2 – 3 times a week to enjoy with bright and even skin tone.

Note: Or mix any one of these ingredients like rosewater, lemon juice, turmeric, yogurt, tomato, milk cream, egg white, green tea, aloe vera, potato juice, etc. in gram flour and apply it on the skin to get healthy and bright skin tone.


Problem – 4: Dandruff

Dandruff is a common hair and scalp problem that makes you feel embarrassed to wear any black or dark colored dresses. It is caused due to the dry or too oily scalp, sensitivity to hair care products, bacteria or fungal growth on the scalp, unhygienic hair care, etc. It results in shedding of dead cells from the scalp with a lot of itching, inflammation, and irritation.

Remedy – Lemon

Lemon has antifungal and antimicrobial properties that prevent dandruff-causing fungus. It is used to cleanse the leftover soap, shampoo, excess oil and any chemicals on the scalp causing dandruff. It moisturizes the scalp and shed away the dead cells to give relief from itching and irritation.

Steps to be followed…

  • Add 1 teaspoon of fresh lemon juice in 2 tablespoons of warm coconut oil.
  • Stir well and apply it on the scalp.
  • Massage it gently on all over the scalp and let it sit for an hour.
  • Then after, wrap your hair in a warm towel and leave for another 20 minutes.
  • Finally, rinse off with mild shampoo and conditioner followed by warm water.
  • Dry your hair and repeat it regularly till you cleared dandruff completely.

Note: Or mix lemon juice with any of these ingredients such as witch hazel oil, fuller’s earth, garlic powder, apple cider vinegar, tea powder, fenugreek seeds, baking soda, etc. and apply it on your scalp to get rid of dandruff.


Problem – 5: Dark Circles and Puffy Eyes

Dark discoloration of the skin under the eyes is defined as dark circles, which is caused due to stress, lack of enough sleep, unhealthy diet, age, certain health problems, spending more hours in front of computers, etc. will allow the blue veins beneath the eyes thin and appear as dark circles.

Remedy – Potato

Potato acts as a natural bleaching agent that lightens the skin under eyes. It has catecholase that reduces the puffiness and darkness under the eyes. It also contains essential nutrients, starch, and other enzymes that moisture and nourish your eyes to get rid of dark circles and puffiness.

Steps to be followed…

  • Wash a potato and peel it off.
  • Finely grate the potato and refrigerate it for few minutes.
  • Then wrap this chilled grated potato in a cheesecloth or gauze.
  • Now place it over the eyes in such a way that it covers dark circles and puffiness.
  • Wait for 20 – 30 minutes and take it out.
  • Rinse off with cool water and gently dry the area to apply eye care moisturizer.
  • Do the same process regularly to get rid of dark circles and puffy eyes.

Note: Or simply place chilled potato slices or its juice on the dark circles or puffy eyes to get relief from the problem.


Problem – 6: Cellulite

Cellulite is caused due to free floating of fat cells just beneath the skin that gives it a dimpled, lumpy look which is similar to cottage cheese. It appears commonly at thighs, hips, buttocks and abdomen.

Remedy – Coffee Grounds

Coffee grounds acts as an excellent exfoliating agent that exfoliates the skin to remove dead cells and thus encourages the new cells growth to prevent cellulite. It tightens the skin to prevent lumpiness and thereby stimulate the lymph and blood flow.

Steps to be followed…

  • Add 3 tablespoons each of organic melted coconut oil and sugar in 1/4 cup of coffee grounds.
  • Stir well and spread it all over the cellulite affected areas of the skin.
  • Massage it gently for few minutes and rinse off after 3 – 5 minutes.
  • Store the remaining mix in a glass container and use it regularly for 3 times a week to clear cellulite.


Problem – 7: Wrinkles

Skin will lose its firmness, moisture and elasticity along with our age, which in turn results in the appearance of fine lines and wrinkles. It is caused due to stress, lack of sleep, sun exposure, smoking, less intake of vitamin E, usage of certain drugs and health problems.

Remedy – Vitamin E Oil

Vitamin E has a moisturizing and antioxidant property that moisturizes the skin and fights against the attack of free radicals to prevent the appearance of wrinkles and fine lines. It also enhances the production of collagen and elastin that keeps the skin firm and smooth without forming wrinkles.

Steps to be followed…

  • Clean the wrinkled area with a mild cleanser and lukewarm water.
  • Pat dry the area and puncture 2 vitamin E oil capsules and squeeze out its oil.
  • Apply it on the wrinkled skin and massage it gently in circular motions for 3 – 5 minutes.
  • Let it sit for overnight and rinse off with lukewarm water followed by cool water.
  • Do the same at every night until you get rid of wrinkles from your skin.

Note: Or include vitamin E rich foods like almonds, avocado, papaya, pumpkin seeds, etc. to delay these aging signs.


Problem – 8: Dry Skin

Dry skin is a common skin problem occurs in the winter season. It is caused due to lack of moisture that results in skin tightness why because the skin was unable to hold it or else the sweat glands are not able to produce the required moisture.

Remedy – Avocado and Honey

Honey is a natural moisturizer that is loaded with antioxidant and humectant properties that lock the moisture in the skin. Avocado is filled with fatty acids, vitamin A & E that repairs and restores the smooth and well moisture skin.

Steps to be followed…

  • Mash a 1/2 part of a ripe avocado and add it to 1/2 cup of raw honey.
  • Stir well and apply it as a mask on the dry skin.
  • Allow it to sit for about 15 – 30 minutes and rinse off with water.
  • Dry the skin gently and apply moisturizer (optional).
  • Repeat the same regularly until you well-moisturized your dry skin.


Problem – 9: Yellow Teeth

Everyone wants sparkling white teeth but due to improper oral hygiene, dental problems, intake of excess fluoride levels, weak immune system, usage of tobacco and its products, etc. are damaging the enamel and thus discoloring your teeth to yellow.

Remedy – Strawberry

Strawberry has astringent property and vitamin C along with malic acid that removes stains, break down the plaque to clean your teeth and make it sprinkle with white color.

Steps to be followed…

  • Cut a strawberry in two halves and sprinkle a little bit of baking soda on it.
  • Start rubbing it on your teeth for few minutes and rinse off thoroughly.
  • Continue the same process regularly to get rid of yellow teeth.


Problem – 10: Chapped Lips

Dryness, cracking, flaking, redness and soreness are symptoms of chapped lips. It happens when the lips were unable to produce natural oils to get well moisturized. It is caused due to dehydration, harsh weather changes, smoking, vitamin deficiency, etc.

Remedy – Rose Petals

Rose petals help you a lot in relieving yourself from this problem. It moisturizes the lips and also enhances its natural color.

Steps to be followed…

  • Wash a handful of rose petals thoroughly in water and soak it in raw milk ( or glycerin) for few hours.
  • Mash the petals to make a fine paste and apply it on your lips.
  • Do the same for 2 – 3 times a day particularly once at night as an overnight process to get rid of dry lips.

Tips and Precautions:

  1. A Healthy diet, regular exercises, proper skin and hair care, drinking plenty of water, avoid usage of chemical based cosmetics or hair care products, etc. will help you to stay fit and healthy.
  2. Make sure to do the skin patch test, especially if you’re using the ingredient for the first time to know whether it causes any allergic reaction or not before using it on regular basis.

Try these best home remedies at home and share your experience with us.


Natural Beauty Tips for Active Women to Stay Fresh and Confident All Day

Natural Beauty Tips for Active Women to Stay Fresh and Confident All Day


Natural Beauty Tips for Active Women to Stay Fresh and Confident All Day

Life as an active woman is rarely slow. Between workouts, work commitments, and social activities, your schedule can get overwhelming. With so much going on, keeping your skin healthy and glowing may seem difficult. That’s why embracing natural beauty tips for active women can make a real difference.


This article is designed to help you maintain a fresh, radiant appearance using simple and natural methods that fit seamlessly into your daily routine. No complicated steps, no harsh products—just practical solutions that support your active lifestyle.


Why Natural Beauty Matters for Active Women

When you’re constantly moving, your skin needs gentle care that won’t slow you down. Natural beauty routines focus on using skin-friendly ingredients and uncomplicated habits that save time while delivering real results. They help reduce irritation, support long-term skin health, and are often more environmentally friendly.


Choosing natural beauty solutions means working with your body, not against it. It’s a smart, sustainable approach that keeps you confident, glowing, and ready for whatever the day brings.


Skincare Simplified: Sweat-Proof Routines

Morning vs. Night Routine for Active Lifestyles

  • AM Routine: Focus on protection. Use a lightweight, mineral-based sunscreen (zinc oxide is a hero!). A rosewater spritz keeps you refreshed midday.
  • PM Routine: Double-cleanse to remove sweat and sunscreen. Follow with a calming aloe vera gel.

Top Natural Ingredients to Look For

IngredientBenefitFound In
Witch HazelReduces post-workout rednessToners, Face Mists
Tea Tree OilFights acne-causing bacteriaSpot Treatments
Coconut OilDeeply hydrates dry ends

Hair Masks, Body Oil


Hair Care That Keeps Up with Your Pace

Braids and buns are cute, but sweat and friction can damage hair. Try a DIY Avocado & Honey Mask weekly: mash 1 avocado + 2 tbsp honey. Apply for 20 mins, rinse, and say hello to shine!


Makeup That Stays Put (Naturally!)

Swap heavy foundations for tinted moisturizers with SPF. Cream-based blushes (like beetroot stain) add a flush that survives spin class. Pro tip: Dust translucent arrowroot powder to set makeup without clogging pores.


Fuel Your Glow: Nutrition Tips for Radiant Skin

Beauty-Boosting Superfoods

FoodBenefitHow to Enjoy
Chia SeedsOmega-3s fight inflammationSmoothie Toppings
WalnutsStrengthens hair folliclesTrail Mix Snack
SpinachIron for a healthy glowSalads, Green Smoothies


How Exercise Impacts Your Beauty Routine

Post-Workout Skincare Must-Dos

  1. Rinse your face with cool water immediately.
  2. Apply a hyaluronic acid serum to replenish moisture.
  3. Avoid heavy creams—let your skin breathe!


Time-Saving Hacks for Busy Schedules

  • Multi-tasking products: Use coconut oil as a makeup remover and hair mask.
  • Dry shampoo hack: Mix cornstarch + cocoa powder (for dark hair) for a natural refresh.


FAQs About Natural Beauty for Active Women

Q: How do I prevent breakouts after sweating?
A: Wash your face within 30 mins post-workout and try a tea tree oil spot treatment.

Q: Can I use natural products for oily skin?
A: Yes! Blot with rice paper and use a clay mask weekly to absorb excess oil.

Q: What’s a quick post-gym hairstyle?
A: A loose braid protects hair and hides frizz—spritz with lavender water for freshness.


Conclusion

With these natural beauty tips for active women, you don’t have to choose between your passions and looking fabulous. Keep your routine simple, organic, and aligned with your energetic lifestyle. Remember, true beauty shines when you feel confident—and these tips are here to help you own it!

Spread the love


Natural Home Remedies to Brighten Dark Underarms

Natural Home Remedies to Brighten Dark Underarms


Natural Home Remedies to Brighten Dark Underarms

Many women love to wear sleeveless tops or elegant strapless dresses. However, having dark underarms often makes them feel self-conscious and hesitant to lift their arms with confidence. This discoloration can take away the joy of wearing your favorite outfits.


Dark underarms can appear due to several everyday habits and conditions — including frequent shaving, sweat buildup, dead skin accumulation, excessive use of deodorants, hair removal creams, tight clothing, friction, hormonal imbalance, obesity, sun exposure, certain medications, or even poor hygiene.


While these factors might sound difficult to manage, restoring your natural underarm tone is absolutely possible. With patience, consistency, and the help of natural remedies, you can safely lighten your underarms without harsh chemicals.


Why Choose Natural Remedies?

Natural treatments are not only gentle and cost-effective, but they also come without the risk of side effects that often accompany chemical-based whitening creams. The ingredients are usually available right in your kitchen and help nourish your skin while brightening it naturally.


Here are some effective natural home remedies you can try to reduce dark underarm discoloration and achieve smoother, lighter skin:


Remedy – 1: (Potato)

Potato has an excellent natural bleaching property that lightens the skin. It has enzymes, starch which fades dark discoloration and gives soft skin. It gently exfoliates the skin, removes dead cells, detoxifies the pores and moistures the skin to prevent darkness in the armpits.

Steps to be followed…

  • Cut a medium potato into 2 slices, each of 1/2 inch thick.
  • Rub your underarms gently with these slices for about 3 minutes.
  • Let it sit for about 7 – 10 minutes and rinse off with lukewarm water.
  • Pat dry and repeat the same for twice daily till you get rid of dark armpits.

Note: Or grate a potato and extract its juice to apply on the dark armpits using a cotton ball. Rinse off after 10 – 15 minutes. Also, add honey or milk or tomato juice to potato juice before application for best results.


Remedy – 2: (Baking Soda)

Baking soda exfoliates the skin to remove dead and damaged skin cells along with promoting the growth of new cells. It has natural skin lightening property and acts as a pH balancer that reduces the melamine production and gives you a natural glow.

It also acts as a natural deodorant that prevents the bad odor and excessive sweating from the armpits by simply absorbing the excess oil and unclogs the pores.

Steps to be followed…

  • Mix enough of water in 2 tablespoons of baking soda to make a thick paste.
  • Apply it on the underarms and scrub the underarms gently for few minutes.
  • Let it sit for 2 – 3 minutes and rinse off thoroughly.
  • Pat dry the area and continue doing the same process regularly to get rid of dark underarms and its rashes.

Note:

  • Or use rosewater or apple cider vinegar or lemon juice or coconut oil or milk instead of water in the above baking soda process.
  • Also, wipe your underarms with this baking soda and water solution. Or dust a powder prepared by mixing equal parts of baking soda and corn starch on your armpits to neutralize its odor.


Remedy – 3: (Lemon)

Lemon has natural bleaching or skin lightening property that lightens up the dark skin. It has antibacterial and antiseptic properties that exfoliate the skin to remove dead cells and other toxins on the armpits. The citric acid content helps to prevent odor and excess sweating.

Steps to be followed…

  • Cut a fresh lemon into wedges and rub a wedge gently on your armpits for 3 – 5 minutes.
  • Let it sit for another few minutes and rinse off thoroughly.
  • For exfoliation, sprinkle some sugar on the lemon wedge before rubbing.
  • Dry your skin and apply moisturizer to prevent dryness and itching.
  • Continue doing it regularly till you get relief from dark armpits.

Note:

  • Or mix 1/4 teaspoon each of honey, turmeric and yogurt in 1 tablespoon of fresh lemon juice to make a paste. Apply it on the dark underarms and rinse off after 10 minutes.
  • Alternatively, mix olive oil or honey or tomato juice or rice flour in fresh lemon juice and apply it on the dark underarms to get rid of the problem.
  • Or else mix orange (or lemon) peel powder in water or milk or rosewater to make a paste. Apply it on the underarms and scrub gently to remove dead cells. Rinse off after 10 minutes.


Remedy – 4: (Cucumber)

Cucumber has natural bleaching property that lightens the skin to fade away the dark armpits. It soothes the skin to prevent itching or irritation caused due to tight fitted clothes or excessive sweating.

Steps to be followed…

  • Cut a cucumber into slices and place it on your dark armpits.
  • Rub it gently for few minutes and let it sit for another few minutes.
  • Rinse off with water and dry the area.
  • Regular follow – up of this process will yield best results of providing brighter armpits.

Note:

  • Or simply apply fresh cucumber juice on the darker armpits.
  • Alternatively, mix fresh lemon juice and turmeric in cucumber juice. Apply it on the affected areas and rinse off after 30 minutes. Repeat regularly.


Remedy – 5: (Coconut Oil)

Vitamin E in coconut oil helps to nourish and moisturize the skin to clear dark armpits. The proteins in this oil help for tissue repair and production of healthy cells which in turn prevents sagging and darkness in your armpits. It acts as a natural deodorant.

Steps to be followed…

  • Apply enough of organic coconut oil on the dark underarms.
  • Massage it gently for few minutes till the oil has absorbed into the skin.
  • Leave it on for about 10 – 15 minutes and rinse off with mild soap and lukewarm water.
  • Repeat the same for 2 – 3 times daily till you get rid of dark underarms.

Note:

  • Or use any natural oils like olive oil or almond oil or jojoba oil or a combination of these natural oils to whiten your armpits.
  • Alternatively, mix sugar or lemon juice or baking soda or any other essential oils to coconut oil and apply it on the skin to prevent the darkness on your armpits.


Remedy – 6: (Apple Cider Vinegar)

The acidic nature of apple cider vinegar will exfoliate the skin to remove excess oil, dead cells and other toxins which result in the darkness of armpits. It restores the pH balance and unclogs the skin pores to lighten up the skin.

Steps to be followed…

  • Mix some water in 1 – 2 tablespoons of apple cider vinegar.
  • Apply it on the underarms and let it sit for few minutes.
  • Rinse off and dry your skin.
  • Do the same process regularly to get relief from dark armpits.

Note: Alternatively, mix baking soda or rice flour or chickpea flour or coconut oil or clay in apple cider vinegar (or distilled white vinegar) and apply it on underarms to get rid of the darkness.


Remedy – 7: (Milk)

Milk has many essential nutrients and fatty acids (including lactic acid) that help a lot in lightening the dark underarms along with softening, brightening the skin to glow with an even tone.

Steps to be followed…

  • Mix 1 tablespoon each of gram flour and plain yogurt in 2 tablespoons of full-fat milk.
  • Stir well to make a paste and apply it on the dark underarms.
  • Wait for 10 – 15 minutes and rinse off thoroughly with cold water.
  • Repeat the same regularly for 4 times a week.

Note:

  • Or simply massage raw milk on the dark underarm areas and rinse off after 5 – 10 minutes.
  • Alternatively, soak few strands of saffron in 1 – 2 tablespoons of milk for 15 minutes and apply this mix on the underarms and leave for 30 minutes to overnight. Rinse off thoroughly.


Remedy – 8: (Gram Flour)

Gram flour or chickpea flour is an excellent scrub that clears the dead skin cells effectively and whitens up your dark underarms. Have a look on the homemade whitening pack.

Steps to be followed…

  • Mix 1 teaspoon each of fresh lemon juice and plain yogurt and a pinch of turmeric powder in 2 tablespoons of gram flour.
  • Stir well to make a paste and apply it on the underarms.
  • Let it sit for 30 – 45 minutes and wet your hands in warm water and start scrubbing it gently for a minute or two.
  • After that, rinse off with warm water and repeat the same daily for 2 weeks and then continue it for twice a week till you achieved whiter underarms.


Tips and Precautions:

  1. In certain cases, dark armpits can be a result of a medical condition called acanthosis nigricans, which you have to consult your doctor for proper medical attention to get rid of the problem.
  2. Instead of using hair removal creams or shaving, prefer waxing to remove your underarm hair, as waxing will remove the dead cells, pigmentation and hair without darkening the armpits.
  3. Make sure to exfoliate your underarms gently while taking your shower to remove dead skin and other toxins causing armpits discoloration.
  4. Remember to get control on your insulin levels, as high levels will cause discolored arms, knees and elbows. Also, maintain proper weight as well.
  5. Avoid wearing too tight clothes, as we came to know that continuous friction and improper ventilation results in dark armpits. Let your body breathe by wearing loose fitting clothes.
  6. Application of some remedies like sandalwood powder and rosewater, yogurt, honey, sunflower oil, papaya juice, mashed apples, vitamin E oil, etc. on underarms will help you to get rid of darkness in your underarms and also prevents its odor.
  7. Avoid using deodorants or antiperspirants why because the alcohol or chemical content of this deo’s will darken the underarms. Use natural deodorants like baking soda, coconut oil, sandalwood and rosewater as an alternative.
  8. Never ever skip a shower, exercise regularly, consume a healthy diet, reduce the stress, wear cotton or skin friendly fabrics, have proper skin care hygiene, etc. should be included in your lifestyle to get rid of darkness in your armpits.
  9. Moisturize the underarm areas with natural moisturizers like aloe vera, coconut oil or lecithin for at least twice a day to prevent darkness. Also, avoid taking oral contraceptive pills.

Enjoy your freedom by raising your hands in the sleeveless outfits after using these natural underarm whitening remedies. Do you know any other effective remedies for whitening the underarms? Then share it with us.


How Aloe Vera Helps Clear Acne Naturally

How Aloe Vera Helps Clear Acne Naturally


How Aloe Vera Helps Clear Acne Naturally

When hair follicles become clogged with excess oil (sebum) or dead skin cells, it often leads to acne, also known as pimples. Several factors can contribute to acne breakouts, including hormonal imbalance, aging, poor diet, stress, and inadequate skin care routines. These blemishes typically appear on the face, neck, chest, and back, often leaving people feeling self-conscious.


While over-the-counter treatments may offer temporary relief, natural home remedies are often more effective in the long run and come without harsh side effects. Among the most trusted natural remedies is aloe vera, a plant widely praised in Ayurveda and traditional medicine for its healing properties.


Often referred to as the “miracle plant” or the “plant of immortality,” aloe vera provides multiple health and beauty benefits. Here are some of the reasons why aloe vera is considered effective in managing acne:

  • The sap of aloe vera contains gibberellins and polysaccharides, which have antibacterial and antiseptic properties that help fight Propionibacterium acnes (the bacteria responsible for acne).

  • Its soothing and anti-inflammatory qualities reduce redness, swelling, itching, and irritation — common symptoms of acne.

  • Magnesium lactate in aloe vera relieves itching caused by breakouts, while its salicylic acid and essential fatty acids help minimize acne flare-ups.

  • Glycoproteins in aloe vera promote healing, reducing pain, redness, and discomfort associated with pimples.

  • With natural astringent and antioxidant effects, aloe vera cleanses clogged pores by removing dirt, dead skin cells, and excess oil, thus preventing new breakouts.

  • Rich in vitamins C and E, aloe vera strengthens the immune system, nourishes the skin, purifies the blood, and supports faster skin cell regeneration, helping the skin heal from acne more quickly.


Aloe vera can be applied directly to the skin or combined with other natural ingredients to enhance its effectiveness. Below, we’ll explore three of the most popular and effective ways to use aloe vera for reducing acne.


Method – 1: (Aloe Vera)

This is the simplest way of using aloe vera on acne. Here we are applying aloe vera directly to get rid of pimples.

Steps to be followed…

  • Wash the acne affected skin areas with mild soap and warm water.
  • Dry the skin with a soft and clean towel.
  • Take a thick aloe vera leaf and cut its edges to open the leaf.
  • Then gently squeeze the gel from the leaf and spread this gel on the pimples affected skin areas.
  • Wait for few minutes to get dry completely on skin.
  • If you want, you can wash it off with lukewarm water followed by cool water or else leave it like that.
  • For more effective results, apply the aloe vera gel at night time before bed time and leave it for overnight.
  • Repeat the aloe application regularly for 2 – 3 times a day to get faster relief from pimples.

Note:

  • Or simply blend aloe vera gel with little of water and apply it on affected skin areas by using a cotton ball.
  • Alternatively, boil pre-shredded aloe vera leaves in water for at least 15 minutes and turn off the heat. Let it cool down and strain it. Use this solution to wipe it off on affected skin areas.


Method – 2: (Aloe Vera Mask with Lemon)

Lemon disinfects the skin pores to clear acne-causing bacteria and other impurities. This face mask heals acne and its scars on the skin.

Steps to be followed…

  • Squeeze out to extract aloe vera gel from aloe leaf and place it in a bowl.
  • Add few drops of fresh lemon juice in aloe gel.
  • Stir it well till both are mixed properly and apply it on the clean face and neck as a mask.
  • Massage it gently for 2 – 3 minutes for the mix to get absorbed into the skin.
  • Wait for 15 – 20 minutes and wash it with warm water.
  • Pat your skin dry with a soft and clean cloth to apply moisturizer (or a little of aloe vera gel).
  • Store the remaining mix in an airtight container and place it in refrigerator for regular usage.

Note:

  • Also, replace the lemon juice with raw honey and follow the same process.
  • Or add egg white (from an egg) in the aloe – lemon mix and spread it as a face mask.


Method – 3: (Aloe Vera Wiping Liquid with Calendula Tincture)

This combination is very effective in removing excess oil from skin pores and inflammation, as it cleanses and closes the skin pores. It is an aloe vera mix used to wipe your skin for clearing acne.

Steps to be followed…

  • Add 2 tablespoons of calendula tincture in 3 – 4 tablespoons of aloe vera gel.
  • Then mix it in 1/4 cup of cooled boiled water.
  • Stir well and use this solution to wipe your face for twice daily till these pimples are completely disappeared from skin.
  • Simply you can carry this mix in an empty spray bottle to anywhere and use it regularly to clear the acne or pimple blemishes.


Tips and Precautions:

  1. Drinking aloe vera juice is another best way of clearing acne from inside the body.
  2. If you don’t have aloe vera plant handy then use organic aloe vera gel or juice that are easily available at health food stores or at your local pharmacy.
  3. Regular aloe application not only speeds up the healing process of acne but also decrease the potential for acne scars on skin.
  4. It’s not necessary to wash off the aloe application on the skin after getting dried completely, as it looks like normal skin.
  5. Be sure to check it on your skin to know whether it causing any allergic reaction or not and then continue using it regularly.
  6. Use organic aloe vera soaps which have glycerin for twice a day to reduce acne along with dry and flaky skin. Also, use aloe vera containing creams, cleansers or gels regularly.
  7. You can also mix tea tree oil, apple cider vinegar, cosmetic clay, rosewater, turmeric, milk, and sugar, etc. with aloe vera gel and spread it on skin to get rid of acne and its scars.
  8. It’s recommended to fix your healthy diet and lifestyle, follow proper skin care hygiene, less usage of cosmetic products, reduce stress levels, etc. to get rid of these pimples now and then.

So, stop waiting and start using aloe vera for pimples. Let me know which one worked well for you in eliminating your acne.


How to Use Honey for Acne Treatment at Home

How to Use Honey for Acne Treatment at Home


How to Use Honey for Acne Treatment at Home

Do you feel self-conscious every time you look in the mirror and see those stubborn pimples? Have you tried countless over-the-counter creams and acne treatments without lasting results? If so, it might be time to turn to a natural solution that has been trusted for centuries—honey.


Honey is often called a “miracle from nature,” and for good reason. For generations, medical practitioners and natural healers have recommended it as a remedy for acne and pimples. Unlike many chemical-based creams, honey is 100% natural, safe, and gentle on the skin. In fact, you’ll even find honey as a key ingredient in many modern skincare products designed to fight acne.


Why Honey Works Against Acne

Honey’s unique properties make it a powerful ally in treating and preventing breakouts:

  • Natural antibacterial power – Honey contains natural antibiotics that fight Propionibacterium acnes, the bacteria responsible for acne.

  • Strong antioxidant effect – Protects skin from free radical damage that can worsen breakouts and scars.

  • Deep cleansing action – Its sticky texture helps draw out dirt, oil, and impurities that clog pores.

  • Osmotic healing effect – Honey absorbs moisture from wounds and releases hydrogen peroxide, preventing infections and new breakouts.

  • Anti-inflammatory relief – Reduces redness, swelling, irritation, and itching caused by acne.

  • Moisturizing benefits – Nourishes and hydrates the skin while gradually fading acne scars.

  • Internal detox support – When consumed regularly, honey can help cleanse the blood, improve circulation, and boost metabolism—supporting clearer skin from the inside out.


How to Use Honey for Acne

If you’re ready to give honey a try, here are three simple yet effective methods to use it for acne treatment. These remedies are easy to follow and can help you see visible improvements in just a few weeks.


Method – 1: (Honey)

This is the simplest method of applying honey for acne.

Steps to be followed…

  • Cleanse your face with mild soap and warm water. Pat the skin dry with soft towel.
  • Apply some raw honey and apply it on the pimples affected skin areas either using your fingers or cotton ball.
  • Let it sit for about 30 – 40 minutes to get dried and sticky.
  • Then wash it off with warm water and pat the skin dry.
  • For getting more effective results, repeat the same process daily for few days and then follow it for once or twice a week till you get complete relief from the problem.


Method – 2: (Honey and Cinnamon)

Cinnamon has natural antibacterial, antioxidant, micro-dermabrasion and anti-inflammatory properties that fight against the acne-causing bacteria. When both of these equally capable ingredients are mixed, then you will get double chance of eliminating acne faster.

Steps to be followed…

  • Cleanse your face and steam it for few minutes to clear dirt and also to open up the skin pores.
  • Dry the skin and add 1 teaspoon of cinnamon powder in 2 tablespoons of honey.
  • Stir well to make fine thin paste and spread this paste on acne affected skin areas.
  • Wait for about 15 – 20 minutes to get dry completely.
  • Then wash it off with warm water and dry the skin.
  • Or apply this paste as a mask on the face and neck by focusing more on the affected areas.
  • Repeat the same process for once or twice a day, if you have more pimple breakouts or else follow the same process for twice a week.


Method – 3: (Honey Scrub with Sugar)

Sugar is a best ingredient used for gentle scrub on skin. This combination clears harsh chemicals on skin and exfoliates the skin to prevent dead cells and dirt.

Steps to be followed for proper scrubbing…

  • Combine 1 teaspoon of sugar (prefer brown sugar) in 1 – 2 teaspoons of raw honey in a bowl.
  • Apply this paste on the skin where it is affected with acne or pimples.
  • Scrub it gently in circular motion for about 3 – 5 minutes.
  • After that, rinse it with warm water and moisturize the skin.
  • Regular follow-up of the same process will definitely help you in curing acne or pimples.


Tips and Precautions:

  1. Combine honey with other natural ingredients like apple pulp, lemon juice, yogurt, aloe vera, tea tree oil, oatmeal, strawberries pulp, aspirin powder, turmeric, etc. and use them to get rid of acne breakouts along with its symptoms.
  2. Be sure to do some patch test to know you’re allergic to topical application of honey and then continue using it on regular basis, if you didn’t find any side effects on skin.
  3. Prefer using manuka honey rather than normal organic honey for grabbing more results and cure acne problem quickly.
  4. Consuming honey is another best method which helps to detoxify the body from inside and prevent the acne along with its recurrence. Drink adding 1 teaspoon of honey and few drops of lemon juice in 1 glass of warm water or spread honey over toasts or add in salad dressing or dishes or mix it in your herbal teas, etc. to boost your metabolism from inside and fight against the acne-causing things.
  5. Apart from simply using honey, you have to take some personal skin care, follow healthy nutritious diet, do some regular exercises, lead a stress less life, etc. for not only curing acne now but also prevent its recurrence.

This is all about Honey on Acne. Just give a trial to these methods for treating your acne, as it cost nothing and also safe for skin. But don’t forget to share your experience with us.


Say Goodbye to Facial Blemishes with Simple Home Remedies

Say Goodbye to Facial Blemishes with Simple Home Remedies


Say Goodbye to Facial Blemishes with Simple Home Remedies

Do you ever feel hesitant to meet people because of blemishes on your face? Hiding indoors or covering up your skin isn’t the solution. Instead, finding the right treatment can restore both your skin and your confidence. While there are options like surgeries or medicated creams, natural remedies are often safer, more affordable, and free from harmful side effects.


If you’re looking for natural ways to clear facial blemishes, you’re in the right place. In this article, we’ll explore how everyday ingredients like baking soda, lemon juice, turmeric, aloe vera, apple cider vinegar, egg whites, strawberries, papaya, oranges, banana peels, and even potatoes can help reduce blemishes and improve your skin’s appearance.


But before we dive into the remedies, let’s take a closer look at what blemishes are, their symptoms, and the common causes.


What Are Blemishes?

Blemishes are imperfections on the skin such as dark spots, acne, pimples, or pigmentation marks. They can develop naturally but are often triggered by stress, clogged pores, or excess oil production.

In simple terms: A blemish is a small mark or spot that affects the natural beauty of your skin.


Symptoms of Blemishes

Blemishes may appear in different ways, including:

  • Uneven skin texture

  • Dark or brown patches

  • Painful or swollen pimples

  • Dryness or itchiness in affected areas

  • Skin discoloration during seasonal changes

  • Small bumps, raised spots, or pus-filled acne


Common Causes of Blemishes

Several factors may contribute to blemish outbreaks:

  • High stress levels

  • Genetic predisposition

  • Hormonal changes

  • New or unsuitable skincare products

  • Excess sebum (oil) production

  • Sudden changes in weather or climate

  • Poor facial hygiene habits

  • Overexposure to sunlight

  • Consuming excessive dairy products


Natural Home Remedies for Blemishes

The good news? You don’t always need expensive treatments to restore clear skin. Simple natural remedies, many of which use ingredients already in your kitchen, can work wonders in fading blemishes and improving skin tone.

Let’s explore these remedies in detail…


Baking soda

Baking soda is an essential ingredient that neutralizes the pH of your skin and wash away the dead cells present on the skin. Multiple dosage of baking soda on blemish prone areas can deter the problem completely. Here are few baking soda combinations that work well to treat blemishes on your face.


Method-1 (Baking Soda and Lemon)

Requirements

  • Baking soda- 1 tbsp
  • Lemon- 1
  • Small bowl-1

What to do

Squeeze lemon juice and dilute it with water. Now add 1tbsp of baking soda to the lemon extract and stir well. Apply the solution on blemish affected areas with the help of cotton. Leave it for some time to dry and wash your face with water. Use this process once in every 2-3 days by storing the solution in an airtight container  for healing blemishes quickly.


Method-2 (Baking Soda and Honey)

Honey is 100% pure and is free from artificial colors, flavors and additives. It is a special gift from nature and is too good for children and adults. When you use baking soda and honey as a combination, it cures the severe burns on your beautiful face.

Requirements

  • Baking soda- 1tbsp
  • Honey- 2-3 tbsp
  • Small bowl-1

What to do

Take both the ingredients- baking soda and honey in required amounts. Mix well in a bowl to form thick paste using a spoon. Massage your face with this solution in circular motion for 15-20 minutes smoothly. The soothe nature of honey helps to relieve skin burns and makes you look fresh. 


Method-3 (Baking Soda and Vinegar)

Baking soda and vinegar is a bubbling combination. Here we discussed a simple procedure to make use of these ingredients as a  remedy for blemishes.

Requirements

  • Baking soda- 1 tbsp
  • Vinegar- 2-3 drops
  • Water- ¼ cup
  • Small bowl-1

What to do

Generally baking soda is highly concentrated. To make it diluted, add with a cup of water and is ready to use now for  face treatment. Take 1 tbsp of baking soda and add it to the diluted vinegar solution in a bowl.  Make a pack on your face with this solution and allow it to dry for 30 minutes. When you rinse with clean water and repeat the course twice a week, you can observe the dark spots vanishing slowly. It makes you look fresh and confident.


Method-4 (Baking Soda and Olive oil)

Requirements

  • Baking soda- 1 tbsp
  • Olive oil- 2-3 drops
  • Small bowl- 1

What to do

Take 1 tbsp of baking soda and 2 drops of olive oil in a small bowl. Now mix both the ingredients until it  forms a thick paste. Apply the paste on blemish affected areas and leave it for 5-10 minutes. Clean your face with cool water and repeat the process twice as a week for better results.


Lemon juice

Instead of looking for a combination you can directly apply on your face. The antioxidants, citiric acid and vitamin C found in lemon juice removes blemishes and skin tan when mixed with tomato and honey. Within weeks, your skin may look clean and shiny.


Method-1 (Lemon and Tomato)

Requirements

  • Lemon-1
  • Tomato-1

What to do

Take 1 medium sized lemon and tomato. Squeeze out the juice of both lemon and tomato in separate bowls. Stir well and apply it on your face. Leave it for 15-20 minutes to dry and rinse it with water. Do this daily at night times. For exfoliation purpose, you can add extra 1 tbsp of oatmeal to the lemon and tomato mixture.


Method-2 (Lemon and Honey)

Another way is to make use of lemon and honey. This duo combination is very simple to prepare at home by following the steps given below.

Requirements

  • Lemon- 1 tbsp
  • Organic Honey- 1 tbsp

 What to do

Combine 1 tbsp of lemon juice and 1 tbsp of pure honey. Rub the solution on your face skin in circular motion for 5-10 minutes. Let the mixture on your face be dry for some time. Repeat the Process daily for a month or so till you see the improvements.


Turmeric

Women mostly prefer turmeric for their facial beauty because of its antioxidant and antiseptic properties. It is widely used in Ayurvedic medicine (compound called curcumin) to treat various diseases especially the skin and hair. Here we illustrated turmeric with wonderful combinations yogurt, lemon and honey.


Method-1 (Turmeric and Yogurt)

Requirements

  • Turmeric powder- ½ tbsp
  • Yogurt – ¼ cup
  • Rose water- 1 tbsp

What to do

Blend all the ingredients i.e. turmeric powder, yogurt and rose water in a bowl. Apply it on your face making a pack that not only cure blemishes, but also eliminates acne and pimple problems naturally. Let the mixture be dry for 10-15 minutes and clean with cool water.


Method-2 (Turmeric, Honey and Lemon)

Requirements

  • Turmeric powder- ½ tbsp
  • Honey- 2 tbsp
  • Lemon-1

What to do

Take the 3 ingredients turmeric powder, honey and lemon in a small bowl. Stir well to make a thick paste. Apply the mixture every alternative day on your face prone to blemishes smoothly with a cotton pad. At first rinse with warm water and then with cool water to remove the applied mixture completely.


Aloe vera

Plant aloe vera in your house that has tremendous health benefits. The aloe vera gel extracted from the aloe leaf has antioxidants and polysaccharides responsible for the effects on your skin and has healing & rejuvenating properties.

Requirements

  • Aloe vera-1 medium sized leaf
  • Lemon juice- 2 tbsp

What to do

Take aloe vera leaf and cut the thorns from both the sides. Also slice the aloe vera leaf into small pieces and carefully extract the gel from it. Add 2 tbsp of lemon juice to the aloe vera extract  and is collected in a small bowl. You can apply the mixture immediately to the blemish prone areas on your face. This mixture can withstand in fridge for a week and use when needed.


Apple cider vinegar

ACV solution is loaded 0% of fats, cholesterol and proteins. Since it is highly acidic in nature cannot be used directly. For better results it is diluted with water and used as face beauty remedies.

Requirements

  • Apple cider vinegar- 2tbsp
  • Water- 2 cups
  • Spray bottle- 1 (medium sized)

What to do

For this method, first dilute the apple cider vinegar simply by adding water to it in a bowl. Still the solution is too strong then you can more water to it. Transfer the  solution from bowl to a spray bottle.  Spray it on your face and dry naturally. After some time wash with cool water and clean your face with a damp towel to get rid of dust or unnecessary particles.


Egg white

Egg white contains 90% of water and 10% of proteins naturally. The enzymes in egg white have the ability to tane the skin and cure blemishes and acne scars. For best outcome egg white ingredient can be used alone.

Requirements

  • Egg white- ¼ cup
  • Face pack brush- 1

What to do

Take an egg and separate egg yolk & white from it using egg white separator machine. Now apply the white on your face with a brush or fingers twice a week. It is better to use brush because it releases pungent smell that cannot deter easily from your hands until you use a mild soap. Allow it to dry for 15 minutes and rinse it with cool water.


Strawberries

Strawberries are a wonderful source of nutrients, antioxidants and widely appreciated for its sweet aroma and bright red colo fruit. Being rich in vitamins, it has the ability to vanish the dead skin, fights against acne scar problems.

Requirements

  • Strawberries- 2-3
  • Honey- 2 tbsp
  • Yogurt- ¼ cup

What to do

Crush  strawberries using fork in a small bowl. In another bowl, add 2 tbsp of honey, ¼ cup of yogurt  and stir well. If necessary, you can also add 1 tbsp of oatmeal to the solution. Rub the obtained solution on your face properly and then wipe off with warm water after 15 minutes. Do this once in a week for skin rejuvenation that makes you look young.


Papaya

Enzymes in papaya exfoliate the skin and brings the oil production under control. When you apply papaya pulp on your face makes you look fresh and young. Here is the simple procedure you must know how papaya slices can be used as a blemish-free skin.

Requirements

  • Papaya pieces- 4-6

What to do

Squash the papaya pieces to make a solution and apply it directly on your face gently with fingers. Let it be dry and then wash with cool water. Repeat the process daily or twice a week for smooth skin on your face and to prevent blemish problem.


Oranges

Oranges loaded with citric acid lightens your skin tone and as a natural bleach for your skin. It helps to treat acne scars, pimples and fight against aging because of its high antioxidant properties. You can purchase orange peel powder from a store or make drying orange peels in sunlight for 4-5 days and then  make a fine powder using Mixer.

Requirements

  • Orange peel powder- 1 tbsp
  • Organic Honey- 2 tbsp
  • Yogurt- ¼ cup

What to do

Mix 1 tbsp of orange peel powder, 2 tbsp of honey and ¼ cup of yogurt in a small container. Spread the paste on your face prone to blemishes. Leave it for 15 minutes before you rinse with cool water. Do it for 2-3 times in a week for positive results on your face skin.


Banana peel

Banana peels are packed with potassium, antioxidants and anti-inflammatory properties that reduce skin burns, redness, pimples, acne and blemish problems.

Requirements

  • Banana peels

What to do

Rub inside peel of a banana on affected areas of  your face gently. Leave it for some time and then wash with clean water. Repeat this process 3 times a day until you get rid of blemishes.


Potato

Potato peels on your face is worth beneficial. It contains several compounds like vitamin C and antioxidants is responsible for treating blemishes and other face related problems.

Requirements

  • 1 medium sized potato

What to do

Peel out the skin from the potato veggie and extract the juice simply by placing it in a mixer. Now apply it on your face twice a day and clean with water. Though you may not see changes at the beginning but slowly get rid of blemishes.


Tips

  • Make fiber-rich fruits and vegetables as a part of your regular diet to stay strong and healthy.
  • Better to consult a cosmetic surgeon or dermatologist before you go for a medication or treatment.
  • Do facial exercises prescribed by the doctor that helps to detoxify the blood and clear your skin.
  • For dry or sensitive skin people its better to use lemon and honey combination on blemish affected areas.
  • Do not allow any sort of ingredient based mixture on your face for more than 30-45 minutes as it can cause allergic reactions.
  • Before you go to bed, change your pillow cover every day as it may can contain bacteria that spoils your beautiful face.
  • Drink plenty of water about 2-3 liters per day to prevent from the occurrence of pimples and skin rashes.
  • Do not poke or squeeze on affected areas of your face with fingers if they are dirty, as it can prolong that particular symptom to some extent.
  • Do not use rough cloths, oil-soaked pads and sponges your face as it can cause irritations which results in forming a new blemishes.
  • Use sunscreen lotions with SPF 15 or higher when you go outside as the rays from sunlight can make blemishes worsen.
  • Massage your skin with oil-free and alcohol-free moisturizers (preferably alpha-hydroxyl acids is good for you) after you take a bath every day or even when you put makeup.

Follow our simple home remedies to cure blemishes on your face and makes you look gorgeous. If you use any other home remedy other than the above mentioned, please share your experience in the comment section given below.